Git 使用指南
Git 是一个开源的分布式版本控制软件。自诞生以来,Git 就以其开源、简单、快捷、分布式、高效等特点,应付了类似 Linux 内核源代码等各种复杂的项目开发需求。如今,Git 已经非常成熟,被广泛接受与使用,越来越多的项目都迁移到 Git 仓库中进行管理。目前常用Git服务商:GitHub & Bitbucket & GitLab & Coding 。
I. Git
Git 进行代码版本管理时,有两种操作方式:图形界面GUI和 命令行Command。
- 命令行Command(Git Bash):没有平台限制,Windows、Linux(Unix、Mac OS X)下都支持,通过 gid add dir/files 添加文件,没有文件数限制。官网下载
- 图形界面GUI(Git GUI):方便操作,推荐GitKraken。
Git 使用四种主要的协议来传输数据:本地传输,SSH 协议,Git 协议和 HTTPS 协议。更多内容点击查看服务器上的 Git - 协议。
推荐使用SSH 协议。
https认证连接需要输入用户名密码。如果想避免交互式输入用户密码,可以将配置
git remote:
1
2
git remote add origin https://用户名:密码@github.com/用户名/repository项目名.git
git push -u origin master
已经配置过的可以通过修改本地项目目录下的
.git/config文件里的 [remote "origin"] 项下的 url 值,也可以通过git remote set-url origin 指令进行修改:1
2
3git remote set-url origin https://用户名:密码@github.com/用户名/repository项目名.git
git remote add origin  https://用户名:密码@github.com/用户名/repository项目名.git
git push -u origin master某些情况下使用https认证进行连接时会出现403错误。
II. Git Bash
最浅显易懂的Git教程面向初学者,实用性超强,掌握了这些东西,你就可以通过Git轻松地完成你的工作。
II.I. SSH 协议
参考链接:多个git账号之间的切换,Git的多账号如何处理?,gitlab/github 多账户下设置 ssh keys。
不同网站可以使用同一个邮箱,这时候不用担心密钥的问题,因为这些网站 push pull 认证的唯一性的是邮箱。使用同一个邮箱,如果你不进行配置用户名和邮箱的话,则会使用全局的用户名和邮箱。为了方便配置,用户名、姓名和邮箱都设置一致 。
打开 【设置】-->【应用】-->【可选功能】-->【已安装功能】,查看 是否安装OpenSSH 服务器和 OpenSSH 客户端。以 管理员模式 运行命令行窗口,执行 net start sshd 命令。重新打开 cmd ,输入 ssh localhost 即可。
II.I.I. 相同邮箱账户
创建账户,设置用户名。
打开
Git Bash
1
$ cd ~/.ssh //转到C:/Users/Administrator/.ssh
- 备份旧的数据并删除(跳过)
1
2
3
4
5# Lists the files in your .ssh directory, if they exist
$ ls -al ~/.ssh
$ mkdir key_backup
$ cp id_rsa* key_backup
$ rm id_rsa*
- 生成新的SSH Key
1
2
3ssh-keygen -t rsa -C "im.sai.li@outlook.com"
# 填写注册email地址,然后一直“回车”ok
# 当然如果你想选择使用密码功能,那么在提示输入密码passphrase时输入你自己的密码。
- 复制生成的密钥
1
2clip < ~/.ssh/id_rsa.pub
或 用文本编辑工具打开id_rsa.pub文件
登陆系统添加SSH公钥,直接粘贴到key文本框中, 点击
add key。title可以随便命名,然后点击add。配置完成之后生成一个
.gitconfig配置文件。
1
2
3$ git config --global user.name "sli1989"
$ git config --global user.email "im.sai.li@outlook.com"
$ git config --list # 查看配置
- 测试连接是否成功。提示:
Hi xx You have successfully authenticated, but GitHub does not provid。e shell access.说明你连接成功了。(Using SSH over the HTTPS port)
1
2
3$ ssh -T git@github.com
$ ssh -T git@gitlab.com
$ ssh -T git@git.coding.net
- 在github中找到 Settings--personal acess token--generate new token,设置全部权限,然后复制API token。
1
2
3# keep it secret! Changing your password will generate a new token
$ git config --global github.user xx # github用户名
$ git config --global github.token xx # 右键粘贴API token。
II.I.II. 不同邮箱账户
如果你的项目邮箱不一致,用config文件管理它们,然后需要在项目根目录下进行单独配置。git配置多个SSH Key
- 生成另一个账号的ssh密匙并复制。将里面的内容添加到后台。同平台的第一个的
SSH Key中也要记得添加?
1
2
3
4$ ssh-keygen -t rsa -C "second_email" -f "wendu"
% 重命名为wendu
$ clip < ~/.ssh/wendu.pub
- 为了让SSH识别新的私钥,需将其添加到
SSH agent中:
1
2
3ssh-agent bash
ssh-add ~/.ssh/id_rsa
ssh-add ~/.ssh/wendu
- 生成
touch ~/.ssh/config并打开vi ~/.ssh/config,编辑config:
1
2
3
4
5
6
7
8
9
10
11
12
13
14
15
16
17
18
19
20
21
22
23# 配置ssh账户
Host github.com
HostName github.com
PreferredAuthentications publickey
IdentityFile ~/.ssh/id_rsa
Host gitlab.com
HostName gitlab.com
PreferredAuthentications publickey
IdentityFile ~/.ssh/id_rsa
Host coding.net
HostName github.com
PreferredAuthentications publickey
IdentityFile ~/.ssh/id_rsa
# 建一个别名,新建的帐号使用这个别名做克隆和更新。
# 比如,将Host替换成gmail.github.com,那么原地址是:git@github.com:test/Mywork.git,
# 替换后应该是:git@gmail.github.com:test/Mywork.git.
Host qq.coding.net
HostName coding.net
PreferredAuthentications publickey
IdentityFile ~/.ssh/wendu
- 2个账号,2个邮箱,自然不能使用之前设置的全局用户名和邮箱了。在项目根目录下进行单独配置。
1
2
3
4
5
6
7
8
9$ git init
#1.取消global
git config --global --unset user.name
git config --global --unset user.email
#2.设置每个项目repo的自己的user.email
$ git config user.name "wendu"
$ git config user.email "second_email"
- 测试连接。
1
2
3$ ssh -T git@git.coding.net
$ ssh -T git@qq.coding.net
# 之后输入 `yes` 并回车,就完成了。
II.II. git remote
为了便于管理,Git要求每个远程主机都必须指定一个主机名。git remote命令就用于管理主机名。
1 | # 列出所有远程主机 |
克隆版本库的时候,所使用的远程主机自动被Git命名为origin。如果想用其他的主机名,需要用git clone命令的-o选项指定。
1 | $ git clone -o jQuery https://github.com/jquery/jquery.git |
II.III. git fetch
一旦远程主机的版本库有了更新(Git术语叫做commit),需要将这些更新取回本地,这时就要用到git fetch命令。默认情况下,git fetch取回所有分支(branch)的更新。如果只想取回特定分支的更新,可以指定分支名。所取回的更新,在本地主机上要用"远程主机名/分支名"的形式读取。比如origin主机的master,就要用origin/master读取。
1 | # 取回origin主机的master分支。 |
II.IV. git pull
git pull命令的作用是,取回远程主机某个分支的更新,再与本地的指定分支合并。
1 | # 如果当前分支只有一个追踪分支,连远程主机名都可以省略。 |
II.V. git stash
储藏可以获取你工作目录的中间状态,也就是你修改过的被追踪的文件和暂存的变更,并将它保存到一个未完结变更的堆栈中,随时可以重新应用。你也可以在其中一个分支上保留一份储藏,随后切换到另外一个分支,再重新应用这些变更。
1 | $ git status |
II.VI. 仓库克隆
选择别人的远程仓库或者自建远程仓库。
建立本地仓库。
我们可以直接将服务器文件夹同步到本地:
1
2
3
4
5
6
7# 把整个项目保存在本地仓库中
$ git clone git@gitlab.com:sli1989/sli1989.gitlab.io.git
$ cd sli1989.gitlab.io
# 同步github上的项目到本地
$ git fetch origin # 缓存区
$ git merge origin/master # 合并分支默认 clone 的是这个仓库的 master 分支。如果最新的代码不在 master 分支上,可以使用checkout命令来把远程分支取到本地:
1
2
3
4
5
6
7
8
9$ git branch -r #查看远程分支
# git branch -a #查看所有分支
$ git checkout origin/other-branch
$ git checkout -t origin/other-branch
# 使用-t参数,它默认会在本地建立一个和远程分支名字一样的分支折叠展开复制代码
$ git fetch origin other-branch:other-branch
# 通过fetch命令来建立的本地分支不是一个track branch,而且成功后不会自动切换到该分支上不要在本地采用如下方法,这样建立的branch是以master为基础建立的,再pull下来的话,会和master的内容进行合并,有可能会发生冲突:
1
2
3$ git branch other-branch
$ git checkout other-branch
$ git pull origin other-branch:other-branch也可以自建本地仓库。在本地创建一个相同的项目,或者在目标文件夹中右键选择
git bash here,进入命令行。1
2
3$ cd {本地路径} # 路径切换,如:cd e:/workspace
$ mkdir hello-world # 新建hello-world文件夹
$ cd hello-world
- 连接远程github项目(只需第一次设置):
1
$ git remote add origin git@gitlab.com:sli1989/sli1989.gitlab.io.git
如有错误提示:fatal: remote origin already exists,执行1
2$ git remote rm origin
$ git remote add origin git@github.com:sli1989/sli1989.github.io.git
II.VII. 添加文件
- 进入文件夹并初始化
1
2
3
4
5$ cd hello-world # 打开这个文件夹
# 若右键选择`git bash here`则以此目录作为当前目录进入命令行状态。
$ git checkout master
$ git init # 初始化
- 新建文件
1
2
3
4
5# (跳过)Touch 命令主要就是用来修改文件的访问时间和修改时间
$ touch README.md
$ git add README.md
$ git add .
II.VIII. 删除文件
- 查看本地分支下的文件
1
$ ls
- 先查看有哪些文件可以删除,但是不真执行删除
1
$ git rm -r -n */src/\*
- 删除命令
1
2
3
4
5
6$ git rm test.txt
# 或
$ git rm raindow -r -f # 删除raindow文件夹及其下所有的文件
# 或
$ git rm -r --cached test.txt
# 如果只想从版本库中删除,但是本地仍旧保留的话,加上 cached 参数
- 告诉你哪些文件被删除了(跳过)
1
$ git status
- 如果误删,恢复到最新版本
1
$ git checkout -- test.txt
II.IX. 忽略设置
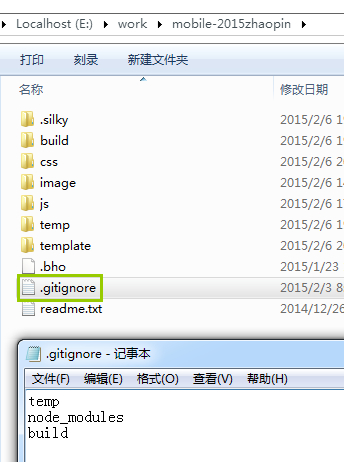
把不需要提交的文件放在忽略的文件夹中。在项目根目录下,和.git 同级目录下,新建一个.gitignore文件
II.X. Git commit
提交到版本控制仓库,必须填写注释信息。
1 | $ git commit -m 'first commit' |
commit log 里面的 #XX 会显示成指向对应 Issue 的链接,对应地 Issue 里面也会出现这条 Issue 被哪个 commit 引用的提示。也可以使用 user/repo#45 引用其他仓库的 Issue 的链接。类似 close/closes/closed/fix/fixes/fixed/resolve/resolves/resolved #XX这样的,还会自动帮你把那条 Issue 给 close 掉。
- 合并多个commit
1
2
3
4
5
6
7
8
9
10
11
12
13
14
15
16
17
18
19
20
21
22
23
24
25
26
27
28
29
30
31$ git checkout -b new-feature master
$ git commit ...
$ git commit ...
$ git checkout new-feature
# 从HEAD版本开始往过去数3个版本
$ git rebase -i HEAD~3
# 要合并的版本之前的版本号,不需要合并的 commit
$ git rebase -i bca36d
# 进入到 vi 的编辑模式
# 输入s,除了第一个 commit 前方的命令改成 squash 或 s,ctrl+c 退出编辑模式
# 输入 :wq 以保存并退出
# 如果有冲突,需要修改,修改的时候要注意,保留最新的历史,不然我们的修改就丢弃了。
# 修改以后要记得敲下面的命令:
$ git add .
$ git rebase --continue
# 放弃这次压缩的话
$ git rebase --abort
# 如果没有冲突,或者冲突已经解决,则会出现编辑窗口
# 修改成新的 commit message
# 输入 :wq 以保存并退出
$ git checkout master
$ git merge new-feature
修改commit说明
修改最近一次提交说明。
$ git commit --amend:这会把你带入文本编辑器,里面包含了你最近一次提交说明,供你修改。当你保存并退出编辑器,这个编辑器会写入一个新的提交,里面包含了那个说明,并且让它成为你的新的最近一次提交。修改多个提交说明。使用rebase工具来衍合一系列的提交到它们原来所在的HEAD上而不是移到新的上。必须通过告诉命令衍合到哪次提交,来指明你需要重写的提交的回溯深度。
II.XI. git push
git push命令用于将本地分支的更新,推送到远程主机。所有本地操作都需要同步到远程仓库。
1 | $ git push <远程主机名> <本地分支名>:<远程分支名> |
- 如有错误提示:
error:failed to push som refs to...,执行
1
2$ git pull origin master
$ git push origin master
- 如有错误提示:
modified: xxx(modified content, untracked content),删除目录下面的.git目录。重新git add .即可
如果需要推送到多个远程仓库:
添加一个远程仓库
git remote add mirror git@github.com:theme-next/hexo-theme-next.git,利用git push -u origin master和git push -u mirror master分别进行推送。添加一个远程仓库
git remote set-url --add github https://git.oschina.net/zxbetter/test.git,利用git push进行推送。修改文件目录中的
.git/config配置文件,这种方法其实和方法二是一样的。如果报错,先分别将本地版本推送到远程仓库,然后再把全部URL都加入。然后第一次提交时需要执行git push -u origin master,再往后就只需要执行git push就能把修改提交到上述三个远端仓库了。
1
2
3
4
5
6
7
8[remote "origin"]
url = git@github.com:sli1989/sli1989.github.io.git
url = git@git.coding.net:sli1989/sli1989.git
url = git@gitlab.com:sli1989/sli1989.gitlab.io.git
fetch = +refs/heads/*:refs/remotes/origin/*
[branch "master"]
remote = origin
merge = refs/heads/master
方法二和三在 push 的时候比较方便。但是在 pull 的时候只能从方法三中的第一个 url 地址拉取代码。而方法一则不存在这种问题(可能要解决冲突)。所以,如果只进行 push 操作,推荐方法二和三,如果也要进行 pull 操作,推荐方法一。在 Git 2.0 将会更改默认的push动作为『只 push 当前 branch 到远端仓库』。如果想继续使用git push both命令需要手动设置一下git push的默认动作git config --global push.default matching。
II.XII. 撤销更改
了解清楚如何检查各种修改之后,我们开始尝试各种撤销操作。
- 已修改,未暂存:
git checkout .或者git reset --hard - 已暂存,未提交:
git reset+git checkout .或者git reset --hard - 已提交,未推送:
git reset --hard origin/master - 已推送:
git reset --hard HEAD^+git push -f
撤销已推送的一般步骤如下:
先
git log查看commit历史记录,找到commit-id。本地代码库回滚:
1
2
3
4
5
6
7
8
9git checkout the_branch
git revert <commit>
# 针对历史中任何一个提交,回滚到commit-id,它没有移除后面的提交
git reset --hard commit-id
# 从当前提交向前回溯,回滚到commit-id,将commit-id之后提交的commit都去除
git reset --hard HEAD^
# 删除最后1次的提交记录
git reset --hard HEAD~3
# 将最近3次的提交回滚
- 远程代码库回滚:
1
2
3
4
5
6git add .
git commit -m "recovery theme"
git push -f origin master
# 删除远程 the_branch
git push origin :the_branch
对于 gitlab,可以进入当前仓库的设置中的 Protected branches 一项,将当前 branch 的 protected 临时去掉,等这次 push 完成,再重新设置回 protected 。
II.XIII. 分支管理
分支通俗说明,点击查看Git 分支 - 远程分支,Git 分支 - 何谓分支。
设置默认分支。WEB项目页setting-brances修改,设置了GitHub默认分支后,本地克隆后版本库的默认分支也将改变。
- 查看分支
1
2$ git branch -r # 查看远程分支
$ git branch -a # 查看所有分支
- 切换分支
1
$ git checkout master
- 新建分支
1
2
3
4
5
6
7
8
9
10
11$ git branch
# 完成新分支的创建
$ git checkout -b branchname
# 同时完成新分支的创建和分支切换。
$ git checkout -b newBrach oldBrach
# 在oldBrach的基础上,复制创建一个新分支。
# 获取tag的代码
$ git tag
$ git checkout -b branch_name tag_name
- 分支推送
1
2
3$ git add hello1
$ git commit -m "add hello1"
$ git push -u origin branchname
- 把远程某各分支拉去到本地的branchname下,如果没有branchname,则会在本地新建branchname
1
$ git fetch origin branchname:branchname
- 获取远程分支remoteName 到本地新分支localName,并跳到localName分支
1
$ git checkout origin/remoteName -b localName
- 查看远程分支列表
1
2$ git ls-remote
$ git ls-remote git@github.com:username/name.git
- 删除本地分支,如果错误信息显示不能删除当前工作分支,需先切换到其他分支。
1
2
3$ git branch -d branchname (删除merge了的分支)
$ git branch -D branchname (删除分支(不管它有没有merge))
# Git在删除分支时为避免数据丢失,默认禁止删除尚未合并的分支。参数-D则可强制删除尚未合并的分支。
- 删除远程分支
1
2$ git push --delete origin branchname
或者 $ git push origin :branchname
- 删除HEAD分支
1
$ git push origin --delete HEAD
- 强制更新 Github上 的分支
1
2git push origin +master # 方法一,使用+强制更新
git push -f origin HEAD^:master # 方法二,使用-f参数
II.XIV. 分支合并
Merge、Rebase 的选择
Git 工具 - 高级合并
图解4种git合并分支方法
Git 分支 - 分支的新建与合并
实际上在很多情况下,Pull Request所含提交有可能造成合并冲突,那样的话 GitHub 不再、也不能提供自动合并功能,就必须采用手工合并的方式。
- 编辑文件解决冲突,再 add 冲突文件,再 commit。
- 对于一些二进制文件,或者不同版本的第三方库引起的冲突。这时候不可能去手工编辑来解决冲突了,必须在两个版本的库中进行一个选择。
1 | # 在新分支上面合并 |
如果git pull之后出现Please enter a commit to explain why this merge is necessary,如果要输入解释的话就需要:
- 按键盘字母
i进入insert模式 - 修改最上面那行黄色合并信息,可以不修改
- 按键盘左上角
Esc - 输入
:wq,按回车键即可
1 | # Fork 后的项目 |
从一个分支合并特定的commits到另一个分支:
- 合并某个分支上的单个commit
1
2$ git checkout master
$ git cherry-pick 62ecb3
- 合并某个分支上的一系列commits,假设你需要合并feature分支的commit76cada ~62ecb3 到master分支。
1
2$ git checkout -b newbranch 62ecb3
$ git rebase --onto master 76cada^
II.XV. 更新 fork 的项目
1 | # clone 自己的 fork 分支到本地 |
II.XVI. Pull Request
- 先要fork别人仓库;
- 克隆fork的仓库到本机上并建立连接:
git clone git@github.com:sli1989/hexo-theme-next.gitgit remote add origin git@github.com:sli1989/hexo-theme-next.git
- 新建一个新分支,作为Pull Request的源分支:
git checkout -b pitch - 编辑代码并commit:
git commit -a -m "Further complement in README & fix pic_url" - push到自己的仓库中:
git push -u origin pitch - 用WEB浏览fork出来的仓库页面,点右上角的【Pull Request】按钮,发起一个Pull Request。弹出的表单自动设置自己的仓库为源仓库,并设置指定源分支、目标仓库和目标分支。
管理PR:
Just edit files in «Files changed» tab. But in this case u can't to edit new files, only files which shown in «Files changed» tab.
Use Git to Add and push.
1
2
3
4
5
6
7
8
9
10
11
12# Add the other user as a remote
$ git remote add otheruser https://github.com/otheruser/yourrepo.git
# Fetch
$ git fetch otheruser
# Create a branch from their repo
$ git checkout -b otheruser-master otheruser/master
# Now make some changes and commit. Push to their repo
$ git push otheruser HEAD:master
# Merge them in if you're good to go:
$ git checkout master
$ git merge otheruser/master
- Use Git in my forked repo.
1
2
3
4
5
6
7
8
9
10$ git checkout -b newmaster mirror
$ git pull git://github.com/ifmos/hexo-theme-next.git master
$ git remote add ifmos https://github.com/ifmos/hexo-theme-next.git
# make some changes and commit
$ git add _config.yml
# git add -A
# git diffs
$ git status
$ git commit -m "update style"
$ git push ifmos HEAD:master
测试PR:
- 可以直接本地建立分支进行git pull:
1
2
3
4
5
6git checkout -b zhuzhuyule-addLeftMode master
git pull git://github.com/zhuzhuyule/hexo-theme-next.git addLeftMode
git checkout master
git merge --no-ff zhuzhuyule-addLeftMode
git push origin master
git am命令用于将一个 patch 文件,合并进入当前代码。Github 对每个 PR 会自动生成一个 patch 文件。我们下载该文件,合并进本地代码,就可以在本地查看效果了。后面网址里面的/cbeust/testng是目标仓库,pull/17表示该仓库收到的第17个 PR。
1
$ curl -L http://github.com/cbeust/testng/pull/17.patch | git am
如果 PR 只包含一个 commit,那么也可以直接下载这个 commit 的 patch 文件。网址里面的`/sclasen/jcommander`是代码变更所在的那个仓库。1
$ curl https://github.com/sclasen/jcommander/commit/bd770141029f49bcfa2e0d6e6e6282b531e69179.patch | git am
- 另一种方法是为 PR 创建一个远程分支,追踪提交者的仓库。
1
2
3
4
5
6
7
8
9
10
11# 创建远程仓库,指向 PR 提交者的仓库
$ git remote add nullin git://github.com/nullin/testng.git
# 从该远程仓库拉取代码
$ git fetch nullin
# 将该仓库的某个分支合并到当前分支
$ git merge kneath/error-page
# 推送到自己的仓库
$ git push origin master
有时,PR 里面包含好几个 commit,但是你只想合并其中的一个或几个。这时可以使用`cherry-pick`命令,挑出你感兴趣的 commit。1
2
3
4
5
6
7
8
9
10
11
12# 建立远程分支,追踪提交者的仓库
$ git remote add nullin git://github.com/nullin/testng.git
# 从该远程仓库拉取代码
$ git fetch nullin
# 只将感兴趣的 commit 加入当前代码
$ git cherry-pick commit1
$ git cherry-pick commit2
# 推送到自己的仓库
$ git push origin master
II.XVII. 子模块管理
添加子模块:
git submodule add <repository> [<path>](git submodule add https://github.com/sli1989/hexo-theme-next.git themes/next),添加后会多一个.gitmodules文件,文件的内容只是保存子模块的引用信息,包括路径和repo地址。删除子模块:
1
2
3
4
5
6
7
8
9
10
11
12
13
14
15
16
17
18
19
20# 首先我们反初始化
# git submodule deinit themes/next
$ rm -rf themes/next
# 这时,子模块文件被删除,同时 .gitmodules 文件中的相关信息被删除
$ cd .git
$ vim config # 删掉submodule信息
$ cd modules
$ rm -rf * # 千万别敲错了,或者可以到文件夹手动删除
# $ rm -rf .git/modules/themes/next
$ cd ../..
$ git rm --cached themes/next
$ rm ./gitmodules
# 或者直接全部删除
# git submodule deinit --force themes/next
- 本地修改更新子模块。默认下 submodule 的 HEAD 处于游离状态,在修改子项目的时候,要用
git checkout master将当前的子模块分支切换到master,然后才能做修改和提交。子项目一旦产生变动,有新的commit id,父项目必需产生一个提交,更新对子项目commit id的引用。子模块被提交后父项目会检测到,正常提交即可!
1
2
3
4
5
6
7
8
9
10
11
12
13
14
15
16
17
18# 首先,我们进入子模块
cd thems/next
# 检出master分支
git checkout master
# 然后做修改
vim some-file.py
$ cd hexo
$ git status
# modified: xx/xxxx/xxxx (new commits)
# add的时候注意再最后不要加 / 斜杠,否则会出现很棘手问题
$ git add xx/xxxx/xxxx
$ git commit -m "Get something done"
$ git push origin master
如果你不慎忘记切换到 master 分支,又做了提交,可以用 cherry-pick 命令挽救。1
2
3
4
5git checkout master
# 记住Warning的 change-id
git cherry-pick change-id
git push
直接从远程仓库更新子模块。使用CI部署时,本地子模块文件
themes/next必须存在,同时需要更新子模块的commit信息。- 在父项目的目录下直接运行
git submodule foreach --recursive git pull origin master,一次全部更新所有的 submodule。 或者在子模块的目录下面更新
git pull,使用和git单独的一个项目是一样的。建议大家git pull之后,立即执行git status,如果发现子模块有修改,立即执行git submodule update。更复杂一些,如果你的 submodule 又依赖了 submodule,那么很可能你需要在git pull和git submodule update之后,再分别到每个 submodule 中再执行一次git submodule update,这里可以使用git submodule foreach命令来实现:git submodule foreach git submodule update。当clone项目时有子模块存在时,第一次是不会clone出子模块的,需要执行一些命令:
1
2
3
4
5
6
7
8
9
10
11
12
13$ git clone git@gitlab.com:sli1989/sli1989.gitlab.io.git
$ cd sli1989.gitlab.io
# 初始化子模块 只在首次检出仓库时运行一次就行
$ git submodule init
# 将子模块的文件check出来 每次更新或切换分支后都需要运行一下
$ git submodule update
# $ git submodule update --init
# 现在所有子模块已经把被checkout到本地,是不是很棒!
# 也可以直接采用
$ git clone <repository> --recursive
$ git submodule update --init --recursive
II.XVIII. 里程碑管理
里程碑即tag,其管理和分支管理非常类似。里程碑和分支一样也是以引用的形式存在的,保存在.git/refs/tags/路径下。引用可能指向一个提交,但也可能是其他类型(Tag对象)。
- 轻量级里程碑:用
git tag <tagname> [<commit>]命令创建,引用直接指向一个提交对象<commit>。 - 带说明的里程碑:用
git tag -a <tagname> [<commit>]命令创建,并且在创建时需要提供创建里程碑的说明。Git会创建一个tag对象保存里程碑说明、里程碑的指向、创建里程碑的用户等信息,里程碑引用指向该Tag对象。 - 带签名的里程碑:用
git tag -s <tagname> [<commit>]命令创建。是在带说明的里程碑的基础上引入了PGP签名,保证了所创建的里程碑的完整性和不可拒绝性。
下面演示一下里程碑的创建和管理。
- 先在本地创建一个新提交。
1
2
3
$ touch hello1
$ git add hello1
$ git commit -m "add hello1 for mark."
- 本地创建里程碑
mytag1、mytag2和mytag3。
1
2
3
$ git tag -m "Tag on initial commit" mytag1 HEAD^
$ git tag -m "Tag on new commit" mytag2
$ git tag mytag3
- 查看新建立的里程碑。
1
2
3
4$ git tag -l -n1
mytag1 Tag on initial commit
mytag2 Tag on new commit
mytag3 add hello1 for mark.
- 将本地里程碑推送到GitHub远程版本库。
1
2
3
4
5
6
7
8
9
10$ git push origin refs/tags/*
Counting objects: 6, done.
Delta compression using up to 2 threads.
Compressing objects: 100% (4/4), done.
Writing objects: 100% (5/5), 548 bytes, done.
Total 5 (delta 0), reused 0 (delta 0)
To git@github.com:sli1989/sli1989.github.io.git
* [new tag] mytag1 -> mytag1
* [new tag] mytag2 -> mytag2
* [new tag] mytag3 -> mytag3
- 删除本地里程碑。
1
2$ git tag -d mytag3
Deleted tag 'mytag3' (was c71231c)
- 删除GitHub远程版本库中的里程碑。
1
2
3$ git push origin :mytag3
To git@github.com:sli1989/sli1989.github.io.git
[deleted] mytag3
II.XIX. 永久删除文件与历史记录
- 从仓库总清除文件
1
2
3git filter-branch --force --index-filter 'git rm --cached --ignore-unmatch path-of-remove-file' --prune-empty --tag-name-filter cat -- --all
# path-of-remove-file是你要删除的文件的相对目录(相对于git repo的根目录),可以使用通配符*匹配文件进行批量删除
# 如果执行上述命令后出现的提示信息中有unchanged字样,说明repo中没有找到path-of-remove-file,请仔细检查路径和文件名是否正确
- 本地同步到服务器
1
git push origin master --force
- 回收磁盘空间
1
2
3
4
5
6
7rm -rf .git/refs/original/
du -sh .git
git reflog expire --expire=now --all
git gc --prune=now
u -sh .git/*
git gc --aggressive --prune=now
du -sh .git
如何删除这些历史记录,形成一个全新的仓库,并且保持代码不变呢?
1 | $ git checkout --orphan latest_branch |
III. Git GUI
Git GUI提供了Git可视化操作,避免命令行输入。
- GitKraken(推荐使用),这款工具操作比较方便,对没有太多git使用经验的新手比较友好,学习成本相对较低。尤其喜欢的一点就是它的分支和提交非常清晰。
- Github Desktop不好用,其图形化界面功能有限。
III.I. Github Desktop
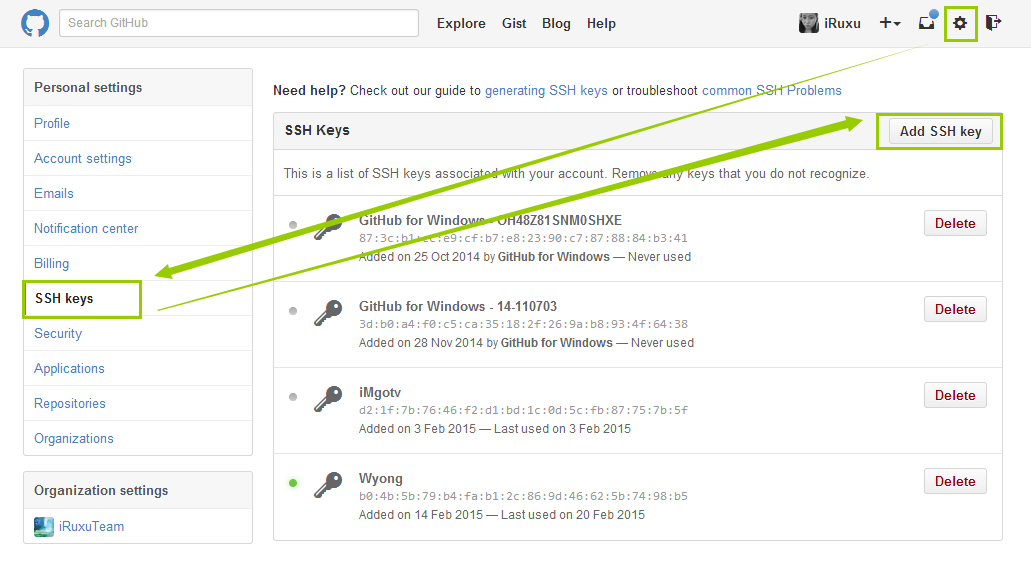
如果Git bash 配置好了,不需要Git GUI 权限校验。第一次才配置。如果不使用git bash 配置,需要单独配置Git GUI 。 1. 在目标文件夹右键,启动GIT GUI。 1. 【Step1-创建密钥】SHOW SSH KEY 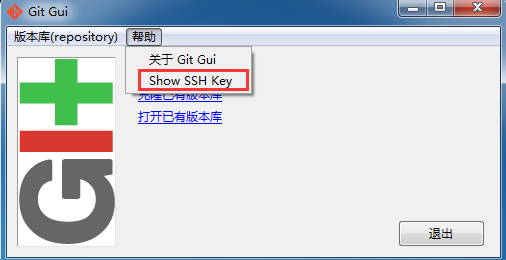 1. 【Step2-添加密钥】登陆github系统。点击右上角的 Settings--->SSH and GPG keys ---> NEW SSH KEY,直接粘贴到key文本框中, 点击 add key。title可以随便命名,然后点击add。

III.I.I. 仓库克隆
选择目标文件夹,选中后点击右键,选择
Git GUI Here,选择“克隆已经存在的仓库”。填写Source Location(源地址)和Target Directory
点击clone后,会提示下输入你github的用户名和密码,出现下面的界面,克隆完成。
III.I.II. 账号保存
如果不做设置的话,每次提交的时候,都会询问你填写密码。
(可跳过)【Step3.1-添加环境变量】我的电脑 - 属性 - 高级系统设置 - 环境变量 - 新建变量,变量名HOME,变量值 %USERPROFILE%
【Step3.2-创建账号文件】windows的管理员账号文件夹
C:/Users/Administrator。新建一个名为_netrc的文件,填写你要保存的服务器地址及账号密码,保存。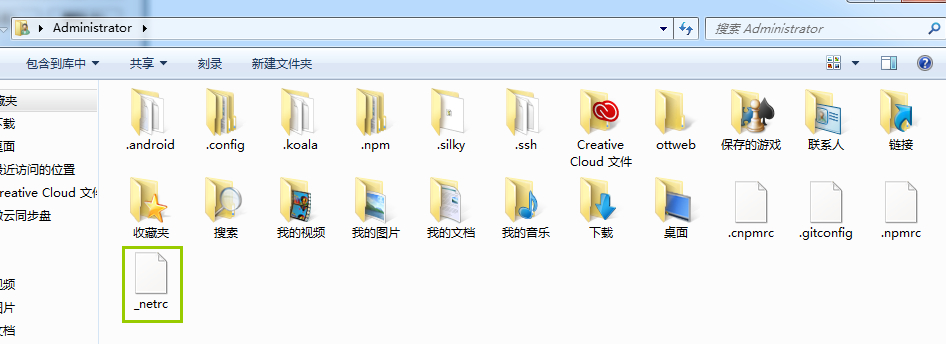
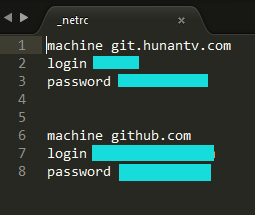
III.I.III. 本地同步到服务器
- 修改属性配置-改为utf-8。
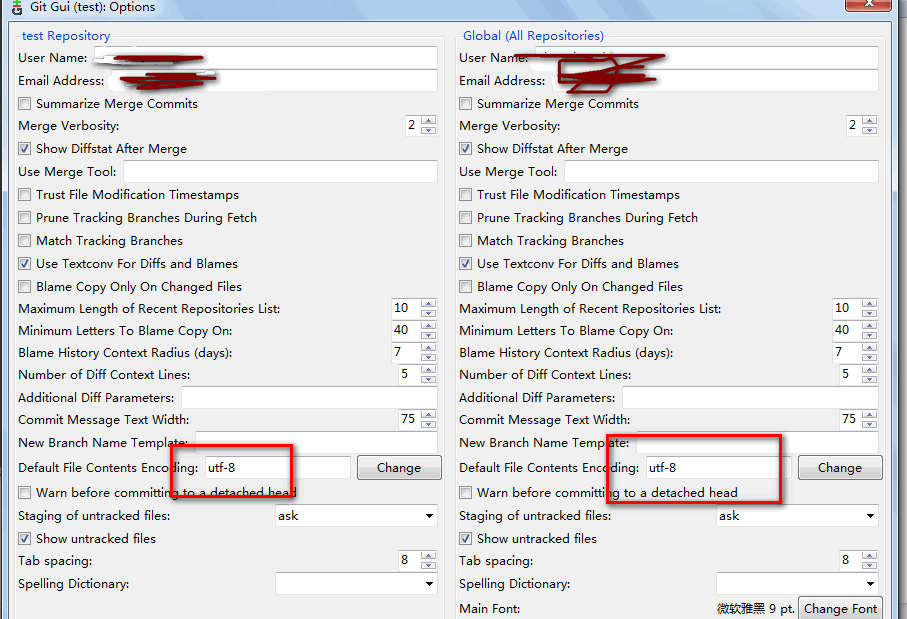
- 修改本地仓库内容。
- 点击RECAN,获取改动文件。
- 选择Stage Changed。
- 提交(Git commit)。提交的时候是要求必须要写备注的。提交则代表此前被添加ADD的文件已确认被提交到Git库了。需要注意的是,如果你改变代码的缩进(尽管没有修改内容),默认状态下会被识别为整个代码全部变更。
- 上传(Git push)。上传至远端服务器。
III.I.IV. 服务器同步到本地仓库
先来设置与远程地址的关联,Git remote:填写SSH地址与项目名。下面有3个选项:第一个:立刻获取最新改动(所以如果是本地克隆远程一个项目,也可以这样操作)。第二个:本地新建的项目,初始化远程仓库并发布过去。第三个:什么也不做。
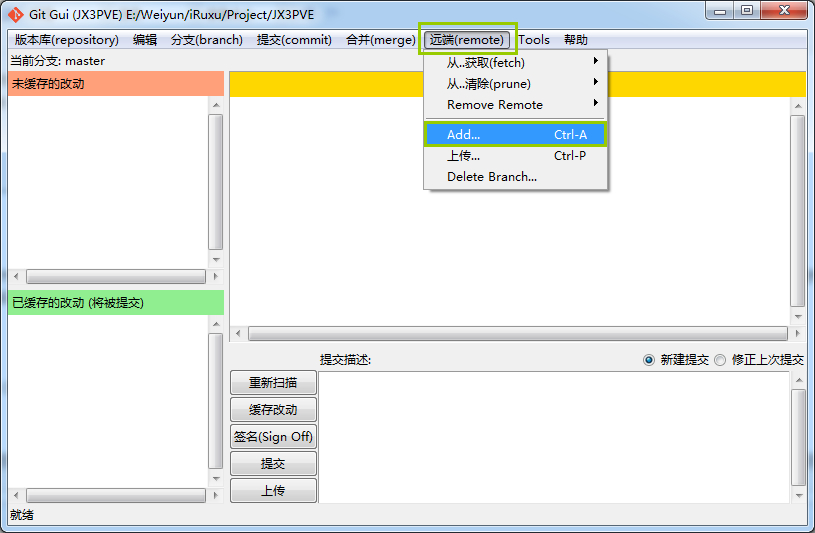
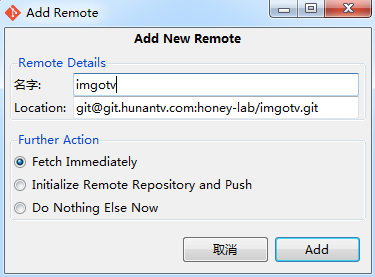
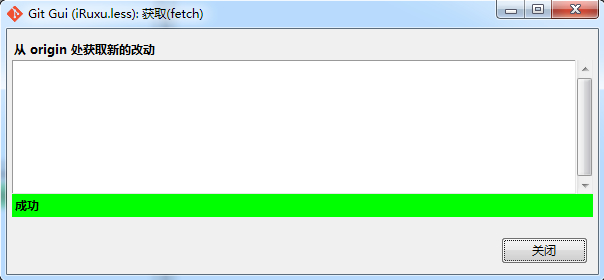
获取仓库的最新改动Git fetch。选择从远程仓库哪个分支中获取更新,如果没有则只有主支。提示成功则改动的已经被存放到临时区了,你一会还需要进行合并操作,如果没有任何改动,则列表中是空的。
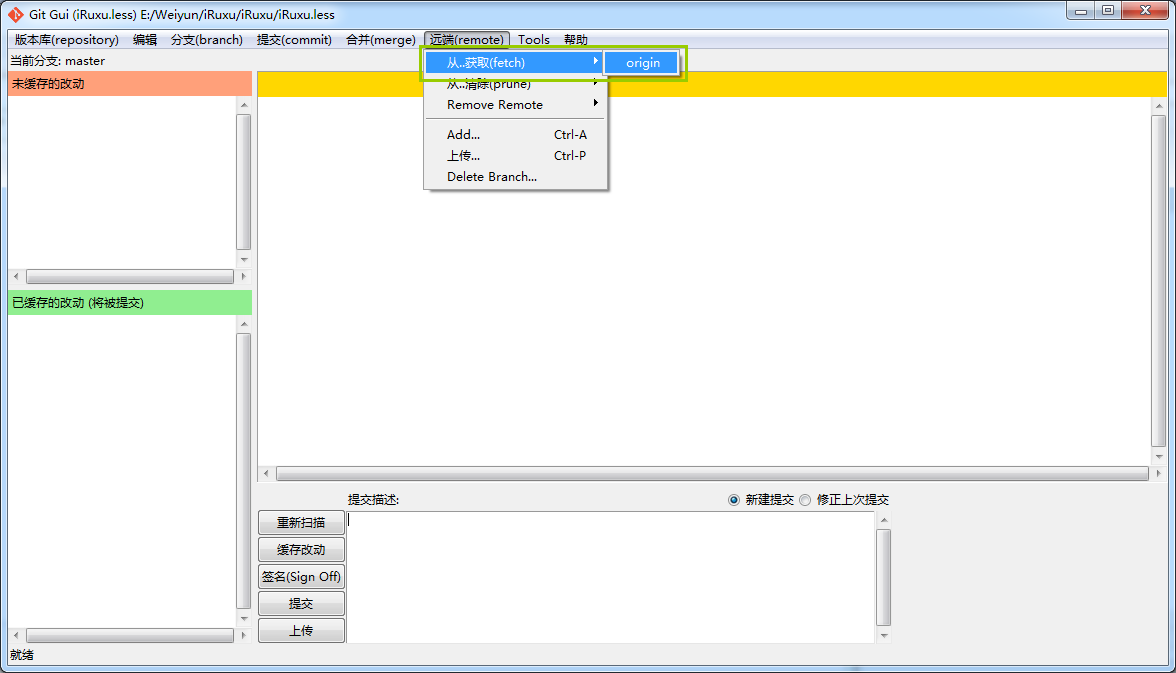
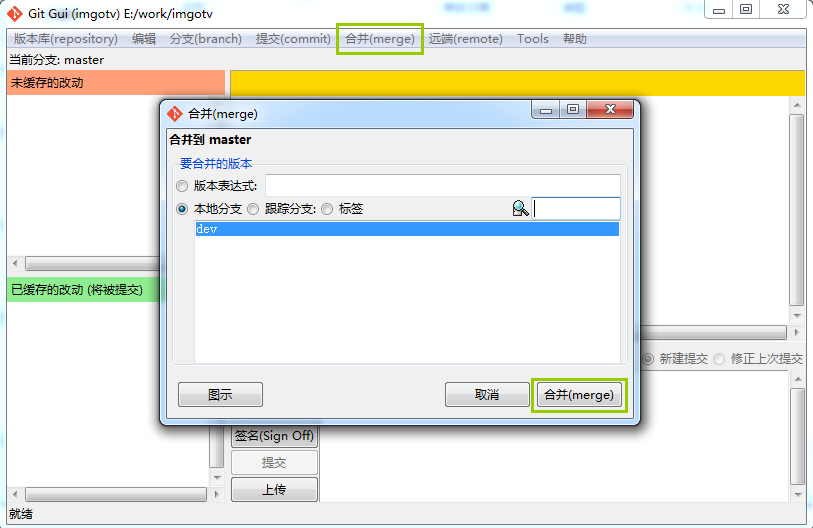
合并(Git merge)。不管你本地有没有代码,fetch之后呢,是都要merge的。选择合并 - 本地合并,然后选择本地的分支(如果你没有创建分支,则只有1个主支master)
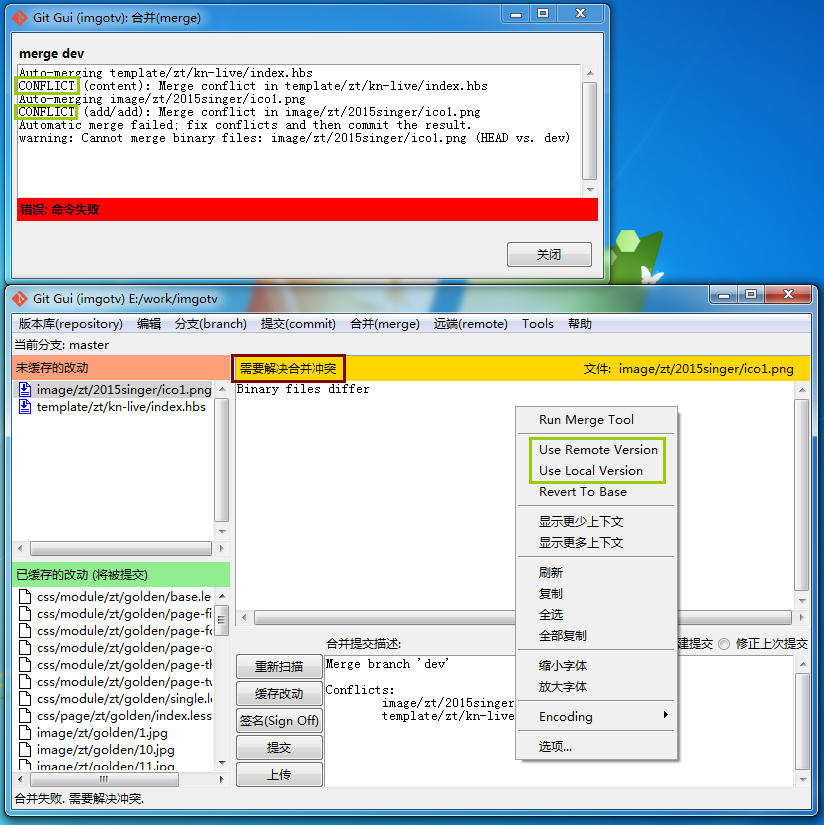
冲突处理(Conflict)。合并的过程中可能会出现一些红色的文件与一堆叹号,只是有冲突的文件。在GUI界面正文区,正文区右键可以选择,Use local version(使用本地版本)或Use remote version(使用远程版本)。
IV. Git Pages
Git Pages有以下几个优点:
- 轻量级的博客系统,没有麻烦的配置
- 使用标记语言,比如Markdown
- 无需自己搭建服务器
- 可以绑定自己的域名
Github是一个通过Git进行版本控制的软件源代码托管服务,由GitHub公司(曾称Logical Awesome)的开发者Chris Wanstrath、PJ Hyett和Tom Preston-Werner使用Ruby on Rails编写而成。与GitHub建立好链接之后,就可以方便的使用它提供的Pages服务,Github Pages分两种,一种是你的GitHub用户名建立的username.github.io这样的用户&组织页(站),另一种是依附项目的pages。Hexo deploy可以部署到很多平台,具体可以参考这个链接。
Gitlab也是一个开源项目托管服务网站,Gitlab pages和Github pages的基本功能都一样,它支持无限的private项目。Gitlab pages和Github pages的基本功能都一样。使用GitLab Pages部署Hexo博客只需要把博客源代码push到repo,然后配置好GitLab Continuous Integration(GitLab CI),就会自动渲染和部署Hexo博客。但是Gitlab pages有一些限制:不能把www子域名重定向到根域名,会同时存在两个版本的网站,这点非常不利于seo。
Coding.net 是一个面向开发者的云端开发平台,提供git/svn 代码托管,代码质量分析,在线WebIDE,项目管理,开发协作,冒泡社区,提供个人和企业公有云及企业私有云的服务。最近Coding Pages进行了改版,在托管的个人pages中添加Hosted by coding pages字样可以去掉等待页面,完成抓取工作,也可以用DNS做国内外分流,顺便解决访问速度慢的问题。
IV.I. 新建仓库
参考:GitLab Pages搭建Hexo博客,Example Hexo site using GitLab Pages
建立仓库。
- Github完成注册后,创建与你的用户名相对应的公开仓库,格式必须是
username.github.io。 - 在Gitlab完成注册。创建与你的用户名相对应的私密/公开仓库,格式必须是
username.gitlab.io。 - 在Coding完成注册。点击
创建新项目,填写相关信息,可以选择私密/公开仓库。项目名称里填上你的用户名(项目名称必须与coding的用户名一致?)可以创建任意名字的私密/公开仓库。进入项目页面,点击左侧栏的代码面板 ,选择Pages 服务一项可以看到部署 Pages 的设置(公开项目点击Pages选项卡即可)。填写您欲部署的分支(默认为coding-pages),点击立即开启,稍等片刻即可完成部署并通过{user_name}.coding.me访问您的网站。
IV.II. 博客建立
详细内容查看HEXO博客的建立与调试。
IV.III. 博客部署
调试完成后,即可博客部署。可分为本地部署和在线部署。在未采用在线部署的时候,更新博客后总需要自己手动 hexo g -d,占用时间;使用在线部署之后(如Git Hooks,Travis CI和Gitlab CI),只需要执行 git push,剩下的静态页面构建过程就由服务器完成。
IV.III.I. 本地部署
Hexo 提供了快速方便的一键部署功能,让您只需一条命令就能将网站部署到服务器上。
- 在本地项目根目录中右键
git bash,测试连接,首次推送设置,以后不需要:
1
2
3
4
5
6
$ git init
$ ssh -T git@github.com
$ git remote add origin git@github.com:sli1989/sli1989.github.io.git
$ ssh -T git@git.coding.net
$ git remote add origin git@git.coding.net:sli1989/sli1989.git
- 配置HEXO部署环境。
1
$ npm install hexo-deployer-git --save
- 修改站点配置文件中部署参数。一个正确的部署配置中至少要有 type 参数,可同时使用多个 deployer。YAML依靠缩进来确定元素间的从属关系。因此,请确保每个deployer的缩进长度相同,并且使用空格缩进。
1
2
3
4
5
6
7deploy:
- type: git
repo: 'git@git.coding.net:sli1989/sli1989.git'
branch: master
- type: git
repo: 'git@github.com:sli1989/sli1989.github.io.git'
branch: master
或者1
2
3
4
5
6
7
8
9
10# deploy沿着左边界写
# type和repo左边空格是2个,多一个少一个都不行
# git与type后面的:中间要有一个空格
# github和coding要与repo后边的:对齐
deploy:
type: git
repo:
github: git@github.com:sli1989/sli1989.github.io.git
coding: git@git.coding.net:sli1989/sli1989.git
branch: master
- 对于coding pages,需要在
source/需要创建一个空白文件Staticfile,因为coding.net需要这个文件来作为以静态文件部署的标志。
1
2cd source/
touch Staticfile #名字必须是Staticfile
- Hexo 提供了快速方便的一键部署功能,执行命令
hexo clean && hexo g -d,就可以在username.coding.me或者username.github.io看到你的博客了。
IV.III.II. Git Hooks
IV.III.III. Travis CI
持续集成,Continuous integration,简称CI。
Travis CI 是一个基于 Github 仓库的持续集成工具,使用一个GitHub Page分支来管理所有博客的源代码,然后由CI编译发布到master主分支。
wafer.li的博文详细介绍了配置步骤1 2。
未测试
首先使用GitHub账号登入在Travis CI,并在Travis中开启GItHub Page的持续集成。
然后设定自动构建过程的配置文件,在本地的blog的git库的顶级目录中新加文件
.travis.yml。通过 GItHub 新增加一个 Personal access token(记得复制),从而使得CI能够push代码。
最后,我们在本地代码中新建分支
source_code,在该分支下执行提交代码。
1
2
3git add . -A
git commit -m "test CI"
git push
~/hexo/.travis.yml文件内容参考:
配置文件中的
${pandoc}是pandoc的下载地址,配置在CI的变量中,后面会具体讲如何设置该变量,同样的${token},${GH_REF}同理。after_script中的user.name,user.email,需要改成你自己的git用户名和邮箱,global中的- GH_REF: github.com/peterxugo/peterxugo.github.io.git需要换成自己的仓库地址。
1 | language: node_js |
1 | sudo: required |
IV.III.IV. Gitlab CI
使用Gitlab自动部署,你只需要在项目的根目录下添加一个.gitlab-ci.yml文件,用来指导服务器如何处理你提交的源文件。然后把博客源代码push到repo,就会自动渲染和部署Hexo博客。也可以配置将其推送到 github 和 coding,,也可以直接到gitlab上去写markdown源文件。
- 先按照Hexo-BLOG搭建和调试本地博客,确保无误后新建(也可以直接改名)目录名为
sli1989.gitlab.io - 将文件
scaffolds,source,themes,.gitignor,.gitlab-ci.yml,_config.yml,package.json复制,同时要将themes/next/目录下的.git文件夹删除,也删除博客目录的.git文件夹再重新配置。 - 配置
.gitlab-ci.yml文件,可以分别进行https链接和ssh链接。
实际上 Hexo 的文章更改时间就是 markdown 文件的最后修改时间。由于 CI 在构建的时候,总是重新 clone repo,这就造成了所有文件的最后修改时间都是最新的 clone 时间;实际上,这并不是 CI 的问题,而是 git 的问题,git 由于分布式的原因,并不会保留文件的最后修改时间;不过,作为一个博客系统来说,我们可以采用 git 的最后 commit 时间来替代,这样子就能恢复文件的修改时间了。
博文解决了 CI 总是更新旧博客的问题。不同的是,GITLAB的GIT_DEPTH是人工设置。
1 | # an experimental feature |
IV.III.IV.I. HTTPS链接
以下.gitlab-ci.yml配置3使用Pandoc渲染器,插件的使用跟Hexo-BLOG本地调试一致,需要什么添加什么。
这里比较重要的:
- 如果您的密码中包含[:@]等符号,请您对密码做
urlencode处理,如@=%40。 - github仓库的地址设置:
https://github.access.token@github.com/github.username/github.usernam.github.io.git,github.access.token第一次生成时才能看到,之后只能通过git config --list查看复制(参考使用hexo+gitlab+ci+github Pages 持续集成写博客)。 - 对于Coding pages的推送,HTTPS 方式 push 大文件可能引发错误。可以执行
git config http.postBuffer 524288000设置更大的限制值。
Success
1 | before_script: |
IV.III.IV.II. SSH链接
官方配置推荐使用的是SSL链接,用gitlab-ci持续集成部署hexo博客和GitLabCI通过ssh进行自动部署介绍了使用过程。
Success
生成部署公钥。与账户 SSH 公钥生成一样,但不能重复使用。打开命令行终端输入
$ ssh-keygen -t rsa -C "im.sai.li@outlook.com" -f ~/.ssh/deploy_rsa,连续点击 Enter 键即可。添加部署公钥。用文本编辑器打开
deploy_rsa.pub文件,复制全部内容。
- 登录 Coding.net,进入目标项目,点击『设置 -> 部署公钥 ->新建部署公钥』,将复制的内容填写到『公钥内容』一栏,公钥名称自定义为
gitlab-deploy。点击『添加』,勾选 部署公钥设置里的『授予推送权限』,然后输入账户密码即可成功添加部署公钥。 - 登录 github,进入目标项目,点击『设置 -> 部署公钥 ->新建部署公钥』,将复制的内容填写到『公钥内容』一栏,公钥名称自定义为
gitlab-deploy。点击『添加』,勾选 部署公钥设置里的『授予推送权限』,然后输入账户密码即可成功添加部署公钥。
添加部署密匙。进入Gitlab项目页面,
SETTINGS-CI/CD-Secret variables,复制密匙\Administrator\.ssh\deploy_rsa内容,名称自定义为DEPLOY_PRIVATE_KEY并记住。设置
.gitlab-ci.yml:
1
2
3
4
5
6
7
8
9
10
11
12
13
14
15
16
17
18
19
20
21
22
23
24
25
26
27
28
29
30
31
32
33
34
35
36
37
38
39
40
41
42
43
44
45
46
47
48
49
50
51
52
53
54
55
56
57
58
59
60
61
62
63# variables:
# GIT_DEPTH: "1000000"
// 注意替换 DEPLOY_PRIVATE_KEY
before_script:
- export TZ='Asia/Shanghai'
- git config --global user.name "sli1989"
- git config --global user.email "im.sai.li@outlook.com"
# Restore last modified time
- "git ls-files -z | while read -d '' path; do touch -d \"$(git log -1 --format=\"@%ct\" \"$path\")\" \"$path\"; done"
# Install ssh-agent if not already installed, it is required by Docker.
# (change apt-get to yum if you use a CentOS-based image)
- 'which ssh-agent || ( apt-get update -y && apt-get install openssh-client -y )'
# Run ssh-agent (inside the build environment)
- eval $(ssh-agent -s)
# Add the SSH key stored in SSH_PRIVATE_KEY variable to the agent store
- ssh-add <(echo "$DEPLOY_PRIVATE_KEY")
# For Docker builds disable host key checking. Be aware that by adding that
# you are suspectible to man-in-the-middle attacks.
# WARNING: Use this only with the Docker executor, if you use it with shell
# you will overwrite your user's SSH config.
- mkdir -p ~/.ssh
- '[[ -f /.dockerenv ]] && echo -e "Host *\n\tStrictHostKeyChecking no\n\n" > ~/.ssh/config'
# In order to properly check the server's host key, assuming you created the
# SSH_SERVER_HOSTKEYS variable previously, uncomment the following two lines
# instead.
# - mkdir -p ~/.ssh
# - '[[ -f /.dockerenv ]] && echo "$SSH_SERVER_HOSTKEYS" > ~/.ssh/known_hosts'
# install pandoc
# - apt-get update -qq && apt-get install -y -qq pandoc
# - wget https://github.com/jgm/pandoc/releases/download/2.7/pandoc-2.7-1-amd64.deb
- wget https://github.com/jgm/pandoc/releases/download/1.19.2.1/pandoc-1.19.2.1-1-amd64.deb
- dpkg -i ./pandoc-1.19.2.1-1-amd64.deb
image: node:10.15.0
pages:
cache:
paths:
- node_modules/
script:
- npm install -g hexo-cli
- npm install
- npm uninstall hexo-filter-auto-spacing --save
- npm uninstall hexo-renderer-marked --save
- npm install hexo-renderer-pandoc --save
- npm install hexo-generator-feed --save
- npm install hexo-generator-topindex --save
- npm install hexo-generator-sitemap --save
- npm install hexo-generator-baidu-sitemap --save
- npm install hexo-generator-searchdb --save
- npm install hexo-symbols-count-time --save
- hexo clean
- hexo generate
- git config --global user.name "sli1989"
- git config --global user.email "im.sai.li@outlook.com"
- hexo deploy
artifacts:
paths:
- public
only:
- master
- 在本地项目根目录中右键
git bash,测试连接,首次推送设置,以后不需要:
1
2
3$ git init
$ ssh -T git@gitlab.com
$ git remote add origin git@gitlab.com:sli1989/sli1989.gitlab.io.git
- 推送本地修改,也可以直接使用Atom安装
Git-Control插件,实现Git操作,点击查看Atom使用指南和Markdown语法。
1
2
3$ git add .
$ git commit -m "update post"
$ git push -u origin master
- 然后可以在博客仓库的Pipelines中查看到Hexo渲染和部署的过程,可以在
Pipelines中查看构建失败的原因。构建成功后,可以访问https://sli1989.gitlab.io/查看搭建效果。
IV.IV. 博客备份
如果我想在另外一台设备上面写博客,必须将整个项目拷贝过来,完成之后要保持两台设备的内容是一致的。在这种情况下一般会将整个项目都托管到 Github/Coding 上面。但是这又会导致另外一个问题,每次有改动的时候不但要部署博客,还要提交项目的代码,这又增加了操作的步骤。
CI自动部署解决这种烦恼,让所有工作交给服务器。因此推荐使用自动部署的方式进行备份,如Git Hooks,Travis CI和Gitlab CI。
IV.IV.I. 上传
hexo g 命令就是根据_config.yml,source目录文件以及themes目录下文件生成博客文件的。同样当我们运行hexo clean命令时,public目录被删除了。因此,需要备份的文件就是scaffolds, source, themes, .gitignor, .gitlab-ci.yml, _config.yml, package.json,这个就是用于多终端同步关键的部分。
- 配置
.gitignore文件。
1
2
3
4
5
6
7.DS_Store
Thumbs.db
db.json
*.log
node_modules/
public/
.deploy*/
- 同步到远程仓库的
Hexo分支。这样你的Github项目中就会多出一个Hexo分支。
1
2
3
4
5
6git add . #添加目录下所有文件
git commit -m "Blog Source Hexo"
git branch hexo
git checkout hexo
git remote add origin git@github.com:sli1989/sli1989.github.io.git
git push origin hexo
IV.IV.II. 下载
- 在B电脑上新建
hexo文件夹。拉下远程仓库文件
1
2git init
git clone origin hexo git@github.com:sli1989/sli1989.github.io.git
或者1
2
3
4git init
git remote add origin git@github.com:sli1989/sli1989.github.io.git
git checkout -b hexo
git pull origin hexo
- 然后进行博客配置,安装插件。
1
2
3
4
5
6
7
8
9
10# 安装必要的所需组件,不用再init;否则之前的hexo配置参数会重置
$ npm install -g hexo-cli
$ npm install hexo --save
# 安装依赖库
$ npm install
# 安装部署相关配置
$ npm install hexo-deployer-git
- 然后写文章,部署博客,同时更新Hexo分支。
1
2
3
4
5
6
7hexo new post "new blog name"
# 新建一个.md文件,并编辑完成自己的博客内容
git add . #添加目录下所有文件
git commit -m "UPDATE Blog Source Hexo"
git push origin hexo # 更新Hexo分支
hexo d -g
- 在不同的终端已经做完以上第一次配置后,以后只需执行以下命令进行更新即可。
1
2
3
4
5
6
7git pull origin hexo
# 先pull完成本地与远端的融合
git add .
git commit -m "xx"
git push origin hexo
hexo d -g
V. Hexo BLOG
参考链接:手把手教你使用Hexo + Github Pages搭建个人独立博客,小白独立搭建博客--Github Pages和Hexo简明教程,Hexo+Github搭建个人博客(二)——配置&主题。
To work locally with this project, you'll have to follow the steps below: Read more at Hexo's documentation.
V.I. 博客初始化
下载安装Node.js。
下载安装Git,进行Git Bash 配置。
博客环境配置:所有必备的应用程序安装完成后,根据自己喜好选择存放目录,右键点击
Git Bash Here,进入Git命令框,执行以下操作。
1
2
3
4
5
6
7
8# 安装 Hexo
$ npm install -g hexo-cli
# 文件夹取名为hexo
$ hexo init hexo
# 注意init会把之前的hexo配置参数会重置
# 会自动安装依赖库 如果没有 手动安装
# $ npm install
- 博客环境配置完成后,可以在站点配置文件
~/blog/_config.yml中配置大部分的参数(如何配置)。要记得把URL换成你的博客地址(http://username.github.io或自定义域名)。
- package.json是应用程序的信息。EJS, Stylus 和 Markdown renderer 已默认安装,您可以自由移除。
- 当您新建文章时,Hexo 会根据 模版scaffolds 文件夹来建立文件。
- 资源文件夹
source是存放用户资源的地方。- 除
_posts文件夹之外,开头命名为_(下划线)的文件 / 文件夹和隐藏的文件将会被忽略。- Markdown 和 HTML 文件会被解析并放到
public文件夹,而其他文件会被拷贝过去。- 主题themes 文件夹。Hexo 会根据主题来生成静态页面。
- 主题选择。进入Hexo的官网主题专栏,挑选喜欢的主题,复制它的github地址,进入
/themes目录,右键Git Bash,在命令行输入。下载完成后,打开站点配置文件~/blog/_config.yml,修改参数为:theme: next,然后编辑主题配置文件~/blog/themes/next/_config.yml进行NexT主题设置。
1
git clone https://github.com/theme-next/hexo-theme-next themes/next
V.II. 博客调试
支持本地预览调试。输入以下命令,然后打开浏览器,进入 http://localhost:4000/ 即可进行博客预览。
1 | $ hexo clean // 每次调试时建议使用 |
推荐使用F12,改到自己想要的样式,然后 Copy 到custom.styl文件即可。使用方法可以参考操作流程图和自定义页面样式
V.III. HEXO升级
更新升级可以享受很多新功能,不用自己去修改文件了。
升级
Node.js:npm install n -g+n latest升级
hexo:npm update -g hexo或者安装指定版本npm install hexo@3.7.0升级
插件:npm update
V.IV. NEXT升级
目前升级 NexT 主题的时候并不是非常的流畅。目前 NexT 将会使用 Hexo 的 Data Files ,将所有的主题配置放置在站点的 source/_data/next.yml 文件中。原先放置在 站点配置文件~/blog/_config.yml中的选项可以迁移到新的位置,同时,主题配置文件~/blog/themes/next/_config.yml可以不用做任何修改。若后续版本有配置相关的改动时,你仅需在 next.yml 中做相应调整即可。
1 | rm -r themes/next |
备份恢复个性化设置:
- 手动备份修改的主题文件;
- 利用SED命令自动修改新主题文件;
- 使用子模块更新方法:源码仓库中可以看到
themes/next目录后有个@xxxxxx,指向子模块的一个提交,点击可以跳转到sli1989/hexo-theme-next仓库。
V.IV.I. 子模块更新
- 进入NexT项目源码页面,点击
fork,这样就将最新的主题源码fork成为自己的项目。
1
2
3
4
5
6$ cd hexo_blog
$ git rm -r --cached themes/next/
$ git submodule add git@github.com:sli1989/hexo-theme-next.git themes/next/
# $ git add .
# $ git commit -m 'add theme next as a submodule'
# $ git push -u origin master
- 导入子项目后,站点根目录会多出
.gitmodules文件,其内容如下:
1
2
3[submodule "themes/next"]
path = themes/next
url = https://github.com/sli1989/hexo-theme-next.git
- 本地部署。
- 为了方便与源项目代码进行同步,设置远程仓库。
1
2
3
4
5$ cd themes/next
$ git remote add upsteam https://github.com/theme-next/hexo-theme-next
# 查看当前的远程仓库
$ git remote -v
a. 如果发现远程仓库有更新,进行拉取与合并,以及[合并冲突处理](#git-merge)。建议使用rebase命令更新`sli1989/hexo-theme-next.git`。1
2
3
4
5
6
7
8
9
10
11
12
13
14$ git fetch upstream
$ git merge upstream/master
# 等价于 $ git pull
# 手动解决合并冲突
$ vim conflict_files
# $ git submodule update
# 解决冲突完毕
# 建议使用rebase命令
$ git add .
$ git commit 'merge upstream updates'
$ git push -u origin master
CI部署。yml的子模块自动更新script未测试通过(Using Git submodules with GitLab CI),目前通过本地更新子模块长传Gitlab进行部署。
1
2
3
4
5
6
7
8
9
10
11# git submodule update --remote --recursive
cd themes/next
git checkout master
git fetch --all
git reset --hard origin/master
git pull
cd ../../
# gitlab推送
git add .
git commit -m "update next"
git push -u origin master~/hexo/.gitlab-ci.yml 1
2
3
4
5
6
7
8+ variables:
+ GIT_SUBMODULE_STRATEGY: recursive
pages:
script:
+ - git submodule init
+ - git submodule update
+ # - git submodule update --init
V.V. NEXT个性化
感谢以下博文:
Hexo 安装主题的方式非常简单,只需要将主题文件拷贝至站点目录的 themes 目录下, 然后修改下配置文件即可。在 _config.yml 中可以修改大部份的配置。
- encrypt the content of a post:hexo-encrypt
- Enhanced code highlighting using highlight.js for Hexo : hexo-filter-highlight
hexo-renderer-marked: Hexo的文章内容默认是不支持emoji表情的。Add support for Markdown. This plugin uses marked as render engine. 配置方法。- Embed aplayer in Hexo posts/pages:hexo-tag-aplayer
一个为Hexo编写的网易云音乐标签插件:hexo-tag-cloudmusicA Flask Music Project:163music-APlayer-you-get-docker
V.V.I. 点击侧栏头像回到首页
设置
~/hexo/themes/next/_config.yml中的头像avatar: /uploads/avatar.gif修改如下代码:
1
2
3
4
5+ <a href="/" class="site-author-image" rel="start" style="border:none">
<img class="site-author-image" itemprop="image"
src="{{ url_for( theme.avatar | default(theme.images + '/avatar.gif') ) }}"
alt="{{ theme.author }}" />
+ </a>
V.V.II. 自定义样式
NexT v6.0.2 引入了个性化文件设置,所有个性化变量、样式等都可以通过styles: source/_data/styles.styl进行添加,使用的时候,只需要添加~/hexo/source/_data里面的文件即可。
~/hexo/source/_data/styles.styl或 ~/hexo/themes/next/source/css/_custom/custom.styl涉及的个性化内容:
- 修改正文顶部与标题行间距,添加如下:
1
2
3.posts-expand .post-meta {
margin: 10px 0 10px 0;
}
- 调整一级标题和正文的间距,添加
1
2
3.post-body h1 {
margin: 0 0 15px 0;
}
- 调整段落下部间距,添加:
1
2
3.post-body p {
margin-bottom: 0.8em;
}
- 修改块引用样式。参考CSS-blockquote引用样式,添加:
1
2
3
4
5
6
7
8
9
10
11// 块引用 样式; 首行不缩进
blockquote {
margin-bottom: 0.8em;
line-height: $line-height-code-block;
font-size: 14px;
font-family: "Microsoft YaHei", Menlo, "PingFang SC", monospace;
border-left: 4px solid #42B983;
p {
// text-indent: -2em;
display: inline;
}}
- 修改行内代码颜色,添加:
1
code { color: #ec7f00; }
- 将文章内链接文本设置为蓝色,鼠标划过时文字颜色加深,并显示下划线。部分链接会出现bug,原因不明。添加:
1
2
3
4
5
6
7
8.post-body p a {
color: #0593d3;
border-bottom: none;
&:hover {
//color: #0477ab;
text-decoration: underline;
}
}
1
2
3
4
5
6
7
8
9
10
11
12
13
14
15
16
17
18
19
20
21
22
23
24
25
26
27
28// 文章超链接样式
.post-body a {
color: rgb(80, 115, 184);
border-bottom: none;
text-decoration: underline;
}
// 菜单超链接字体大小
.menu .menu-item a {
font-size: 15px;
}
// 菜单超链接样式
.menu .menu-item a:hover {
border-bottom-color: rgba(161, 102, 171, 0);
}
// 超链接样式
a {
color: rgb(80, 115, 184);
border-bottom-color: rgb(80, 115, 184);
}
a:hover {
color: rgb(161, 102, 171);
border-bottom-color: rgb(161, 102, 171);
}
// 侧栏超链接样式(友链的样式)
.sidebar a {
color: #ccc;
border-bottom: none;
}
- 段落缩进。不建议使用缩进,有序列表格式乱套,添加:
1
2
3
4
5// 设置段落首行缩进,调整段落下部间距
.post-body p {
text-indent: 2em;
margin-bottom: 0.8em;
}
对于不需要缩进的段落,采用特定标志 `ooNoIndent00` 添加在段落的最前面,js 预处理去掉该标志,并设置不缩进。在`~/hexo/themes/next/source/js`中添加文件`custom.js`并添加:1
2
3
4
5
6
7
8
9// 特定段落(标志 ooNoIndent00)不缩进
$('p:contains("ooNoIndent00")').each(function() {
var str = $(this).text();
if (str.match("^ooNoIndent00")) {
var text = $(this).html();
$(this).css('text-indent', '0em');
$(this).html(text.replace('ooNoIndent00', ''));
}
});
~/hexo/source/_data/styles.styl或 ~/hexo/themes/next/source/css/_variables/custom.styl 涉及的个性化内容:
- 修改全局字体大小,添加:
1
2
3$font-size-base = 16px; // 默认是 16px 大小
$font-family-headings = Georgia, sans // 标题,修改成你期望的字体族
$font-family-base = "Microsoft YaHei", Verdana, sans-serif // 修改成你期望的字体族
- 更改全站外链颜色,添加:
1
2// Global link color.
$link-color = #4078c0
- 使图片默认居中:
1
2- .post-body img {margin: 0; }
+ .post-body img {margin: 0 auto;}
V.V.III. 设置静态背景图像
设置背景图片,且不随页面滚动。
将背景图文件
background.jpg置于/themes/next/source/images/文件夹内。或者使用自动更新背景图片:https://source.unsplash.com/random/1600x900修改如下代码:
1
2
3
4
5
6
7
8// Custom styles.
body {
background: url(/images/background.jpg);
// background: url(https://source.unsplash.com/random/1600x900);
background-attachment: fixed;
background-repeat: no-repeat;
background-position:50% 50%;
}
- 修改不透明度。
1
2
3
4
5
6
7.main-inner {
margin-top: 60px;
padding: 60px 60px 60px 60px;
background: #fff;
opacity: 0.8;
min-height: 500px;
}
V.V.IV. 博文置顶
- 环境配置:
如果安装hexo-generator-topindex插件,可跳过修改
hero-generator-index插件的js代码。1
$ npm install hexo-generator-topindex --save
手动修改
hero-generator-index插件,修改如下代码:1
2
3
4
5
6
7
8
9
10
11
12
13
14
15
16
17
18
19
20
21
22
23
24
25
26
27
28'use strict';
var pagination = require('hexo-pagination');
module.exports = function(locals){
var config = this.config;
var posts = locals.posts;
posts.data = posts.data.sort(function(a, b) {
if(a.top && b.top) { // 两篇文章top都有定义
if(a.top == b.top) return b.date - a.date; // 若top值一样则按照文章日期降序排
else return b.top - a.top; // 否则按照top值降序排
}
else if(a.top && !b.top) { // 以下是只有一篇文章top有定义,那么将有top的排在前面(这里用异或操作居然不行233)
return -1;
}
else if(!a.top && b.top) {
return 1;
}
else return b.date - a.date; // 都没定义按照文章日期降序排
});
var paginationDir = config.pagination_dir || 'page';
return pagination('', posts, {
perPage: config.index_generator.per_page,
layout: ['index', 'archive'],
format: paginationDir + '/%d/',
data: {
__index: true
}
});
};
- 然后博客文件头中添加 top 值,数值越大文章越靠前,如
1
2
3
4
5
6title: 解决Charles乱码问题
date: 2017-05-22 22:45:48
tags: 技巧
categories: 技巧
copyright: true
+ top: 100
- 为了方便记忆top数,修改置顶规则。使得top数值越小,文章越靠前。
本地修改:将
~/hexo/node_modules/hexo-generator-index/lib/generator.js代码中return b.top - a.top;替换成return a.top - b.top;即可。在线CI部署:
1
2
3
4
5
6
7
8
9pages:
cache:
paths:
- node_modules/
script:
- npm install -g hexo-cli
- npm install
- npm install hexo-generator-topindex --save
- sed 's/b.top - a.top/a.top - b.top/' -i node_modules/hexo-generator-topindex/lib/generator.js
V.V.V. 博文排序
目前文章按创建日期(即 Front-matter 中的 date)排序。
- 基于插件
hexo-generator-index,
修改如下代码:
1
2- order_by: '-date'
+ order_by: '-updated'这样的话就只按
updated排序了,因此所有文章的Front-matter中都必须要有updated,已发布的文章可以手动修改或者找方法批量将data换成updated,对于将来的文章,将~/hexo/scaffolds/post.md在date后加入一行updated: {{ date }}。
- 在插件hexo-generator-topindex或者hexo-generator-index-pin-top4的基础上,将
~/hexo/node_modules/hexo-generator-index/lib/generator.js代码中a.date,b.date分别改为a.updated,b.updated即可。
1
2
3
4
5
6
7
8
9
10pages:
cache:
paths:
- node_modules/
script:
- npm install -g hexo-cli
- npm install
- npm install hexo-generator-topindex --save
- sed 's/a.date/a.updated/' -i node_modules/hexo-generator-topindex/lib/generator.js
- sed 's/b.date/b.updated/' -i node_modules/hexo-generator-topindex/lib/generator.js
V.V.VI. 博文标题序号
虽然toc.number提供了目录的标题序号,但文章内部的标题却没有添加。使用hexo-heading-index可以解决这个问题。
1 | $ npm install hexo-heading-index@latest --save |
站点配置文件中添加如下代码,同时关闭主题配置文件toc.number:
1 | heading_index: |
1 | toc: |
其中对于每一个序号的样式定义,我们放在了index_styles中,它由1-6个序号样式用空格连接组成,每个样式如下:
1 | <前缀>{序号类型[:样式:序号宽度]}<后缀> |
对于默认设置有如下解释:在指定全局前缀为空,全局后缀为.,连接符为.,每一级的标题序号都使用同样的序号类型:1,没有前缀和后缀,默认样式和序号宽度。生成序号1.2.3.4.。
比如生成序列号0x00 0x01::
1 | heading_index: |
V.V.VII. 配置emoji表情
未测试
- 使用CI自动配置博客,参考让 Hexo NexT 支持 emoji 表情。
$ npm install hexo-filter-github-emojis --save站点配置文件中添加如下代码:默认配置下是使用图片表情,如果需要使用 Unicode 表情,可以将上面配置中的
unicode设置为true。1
2
3
4
5
6githubEmojis:
enable: true
className: github-emoji
unicode: false
styles:
localEmojis:hexo NexT 使用
FancyBox这个图片插件导致渲染错误。修改如下代码:1
2
3
4
5
6
7
8
9
10
11
12
13algolia: {
applicationID: '{{ theme.algolia.applicationID }}',
apiKey: '{{ theme.algolia.apiKey }}',
indexName: '{{ theme.algolia.indexName }}',
hits: {{ theme.algolia_search.hits | json_encode }},
labels: {{ theme.algolia_search.labels | json_encode }}
- }
+ },
+ emojis: {
+ className: '{{ config.githubEmojis.className | default('github-emoji') }}'
}
};
</script>修改如下代码:
1
2
3
4
5
6
7
8
9
10
11
12
13
14
15
16
17
18
19
20
21
22
23
24
25
26
27
28
29
30
31
32$('.content img')
.not('[hidden]')
- .not('.group-picture img, .post-gallery img')
+ .not('.group-picture img, .post-gallery img, img.' + CONFIG.emojis.className)
.each(function () {
var $image = $(this);
var imageTitle = $image.attr('title');
var $imageWrapLink = $image.parent('a');
if ($imageWrapLink.size() < 1) {
var imageLink = ($image.attr('data-original')) ? this.getAttribute('data-original') : this.getAttribute('src');
$imageWrapLink = $image.wrap('<a href="' + imageLink + '"></a>').parent('a');
}
$imageWrapLink.addClass('fancybox fancybox.image');
$imageWrapLink.attr('rel', 'group');
if (imageTitle) {
$imageWrapLink.append('<p class="image-caption">' + imageTitle + '</p>');
//make sure img title tag will show correctly in fancybox
$imageWrapLink.attr('title', imageTitle);
}
});
$('.fancybox').fancybox({
helpers: {
overlay: {
locked: false
}
}
});替换
hexo-renderer-stylus插件,1
2$ npm un hexo-renderer-stylus --save
$ npm install hexo-renderer-stylus-plus --save添加如下代码:
1
2
3
4
5
6
7
8
9// Github emojis class name
// --------------------------------------------------
get_emoji_class() {
emoji_class = hexo-site-config('githubEmojis.className')
return emoji_class ? emoji_class : 'github-emoji'
}
$github-emojis-class-name = get_emoji_class()最后在自定义样式文件中添加:
1
2
3
4
5
6
7img.{$github-emojis-class-name} {
display: inline;
height: 1.7em;
width: 1.7em;
vertical-align: -0.4em;
border: none ;
}
- 使用本地配置博客,参考如何使用 emoji。
V.V.VIII. 配置Sitemap
Sitemap 的提交主要的目的,是要避免搜索引擎的爬虫没有完整的收录整个网页的内容,所以提交 Sitemap 是能够补足搜索引擎的不足,进而加速网页的收录速度,达到搜寻引擎友好的目的。注意path前面是二个空格缩进。
1 | $ npm install hexo-generator-sitemap --save |
将其配置到站点配置文件中。
1 | sitemap: |
对于国内用户还需要安装插件 hexo-generator-baidu-sitemap。
1 | $ npm install hexo-generator-baidu-sitemap --save |
将其配置到站点配置文件中。
1 | baidusitemap: |
V.V.IX. 添加菜单页
- 在主题配置的
_config文件下找到menu,添加menu的内容。然后在主题的配置文件添加menu_icon字段设置对应的icon。 - 在
Hexo/source文件夹下面新建名字为photo的文件夹,里面添加一个index.md文件(命令行:hexo new page "photo")。 - 自己到FontAwsome官网图标集中选择自己喜欢的icon,然后记住名字,保存在主题配置文件
~/blog/themes/next/_config.yml中的menu_icon字段中就可以啦,不需要加上前面的"icon-"。 - 如果想要中文的名字,并且想要个性化定制我们的页面,可以在主题的
/themes/next/languages/zh-CN文件下的zh-CN(中文)语言包下增加相应的menu字段。注意冒号后面留空。 - 在写文章的时候,在头部信息添加相应的字段,就在tags页面和categories中显示相应的分类。
V.V.X. 添加阅读榜
参考博客,首先我们可以使用leancloud来统计页面阅读数量,以及储存这些信息,然后通过leancloud提供的api编写js脚本来获取阅读数量信息,并展示在页面上。
Valine评论与自定义页面API访问冲突,需要强制刷新加载。为了实现阅读量的展示,目前(2019年5月6日)的解决方案只有利用最新的Valine评论开启浏览量设置visitor: true并关闭leancloud_visitors。
添加menu菜单,并设置中英文和图标。
添加如下代码:
1
2
3
4
5
6
7
8
9
10
11
12
13
14
15
16
17
18
19
20
21
22
23
24
25
26
27
28
29
30
31
32
33
34
35---
comments: false
---
{% centerquote %}阅读榜Top 30{% endcenterquote %}
<p align="justfly" id="hits"><br></font></p>
<script src="//cdn1.lncld.net/static/js/3.0.4/av-min.js"></script>
<script>AV.initialize("leancloud_visitors_id", "leancloud_visitors_key");</script>
<script type="text/javascript">
var num=30
var time=0
var title=""
var url=""
var query = new AV.Query('Counter');
query.notEqualTo('id',0);
query.descending('time');
query.limit(num);
query.find().then(function (todo) {
for (var i=0;i<num;i++){
var result=todo[i].attributes;
time=result.time;
title=result.title;
url=result.url;
var content="<p>"+"<font color='#e20404'>"+"热度"+time+"℃"+":"+"<a href='"+"https://sli1989.github.io"+url+"'>"+title+"</font>"+"</a>"+"</p>";
//document.write("<a href='"+"https://sli1989.github.io"+url+"'>"+title+"</a>"+" Readtimes:"+time+"<br>");
document.getElementById("hits").innerHTML+=content
}
}, function (error) {
console.log("error");
});
</script>
V.V.XI. 配置评论系统
Valine评论系统:基于LeanCloud的极简的评论系统,快速开始,评论系统从Disqus迁移到Valine。(LeanCloud切换国际版)
Valine-Admin 添加了后台管理功能。如有需要,可以使用 Github Action 来实现应用实例的定时自动部署及唤醒:优雅解决LeanCloud流控问题,leancloud-auto-deploy。
我们可以和添加阅读榜一样,添加评论区进行查看。因为不同 leancloud 版本库造成初始化失效问题。Valine评论与自定义页面API访问冲突,请设置所有源设置为
<script src="//cdn1.lncld.net/static/js/3.0.4/av-min.js"></script>。但是文章基于LeanCloud的阅读量失效,需要等待仓库更新。
1
2
3
4
5
6
7
8
9
10
11
12
13
14
15
16
17
18
19
20
21
22
23
24
25
26
27
28
29
30
31
32---
title: Comments
comments: false
---
{% centerquote %}留言板{% endcenterquote %}
<p align="justfly" id="heheda"><br></font></p>
<script src="//cdn1.lncld.net/static/js/3.0.4/av-min.js"></script>
<script>AV.initialize("leancloud_visitors_id", "leancloud_visitors_key");</script>
<script type="text/javascript">
var num=50
var query = new AV.Query('Comment');
query.notEqualTo('id',0);
query.descending('createdAt')
query.limit(num);
query.find().then(function (todo) {
for (var i=0;i<num;i++){
var result=todo[i].attributes;
title=result.comment;
url=result.url;
nick=result.nick;
var updatedAt = todo[i].updatedAt;
var content="<blockquote>"+"<font size=2>"+"<a href='"+"https://sli1989.github.io"+url+"#comments"+"'>"+"<font color='#9932CC'>"+nick+"</font>"+"</a>"+" commented on "+updatedAt+":"+"<br>"+title+"</font>"+"<blockquote>";
document.getElementById("heheda").innerHTML+=content
}
}, function (error) {
console.log("error");
});
</script>
- 最后在主题配置文件中开启即可:
1
2
3
4
5
6
7
8
9
10# Valine.
# You can get your appid and appkey from https://leancloud.cn
# more info please open https://github.com/xCss/Valine
valine:
enable: true
appid: # your leancloud application appid
appkey: # your leancloud application appkey
notify: false # mail notifier , https://github.com/xCss/Valine/wiki
verify: false # Verification code
placeholder: Comment input placeholder
V.V.XII. 配置音视频播放器
详细音视频插入方式,点击查看音乐外链播放器和视频播放器配置。
V.V.XII.I. 侧边栏音乐播放器
由于Next.Pisces主题无法调整侧边栏大小,网易云播放器外观受限,使用网易云播放器需要使用Next.Mist主题。网易云播放器为iframe结构,还是偶尔会提示“资源未加载”问题。
虾米播放器为embed结构(flash player),暂时没有出现“资源未加载”问题。也可以根据博客主题实现外观调整。暂时推荐使用虾米外链播放器。
说明:Chrome浏览器中,需要手动点击才能查看flash控件。在Chrome高版本中,plugins 页面被移除后,可以访问:
chrome://settings/content调整 Flash、PDF 的设置。如果你想让所有网站都默认启用 flash 不用一个个的添加,可以访问:chrome://flags/#run-all-flash-in-allow-mode选择允许。
添加如下代码:
注意添加位置,在
theme.sidebar.b2t按钮前面添加,全站网页均可见:在set cc前面添加,只有主页可见播放器
``diff ~/hexo/themes/next/layout/_macro/sidebar.swig ...
% 网易云播放器
<iframe frameborder="no" border="0" marginwidth="0" marginheight="0" width="280" height="260" src="//music.163.com/outchain/player?type=2&id=38358214&auto=0&height=66">
</iframe>% 虾米播放器 Pisces主题设置 200240 Mist主题设置 270240
<embed src="http://www.xiami.com/widget/9731524_277625635_300_260_d90000_333333_0/collectPlayer.swf" type="application/x-shockwave-flash" width="300" height="260" wmode="opaque"></embed>
</div>1 |
|
loadMusic函数后面,新定义一个函数。sessionStorage.autoPlay = "true"控制自动播放。1
2
3
4
5
6
7
8
9
10
11
12
13
14
15
16
17
18var FirstLoad = function (i, time) {
if (i == undefined) {
i = 0
currentTrack = 0
shuffleIndex = 0
}
loadMusic(i)
if (time) {
audio.currentTime = time
}
if (localStorage.volume) {
audio.volume = localStorage.volume
}
if (sessionStorage.autoPlay == undefined) {
sessionStorage.autoPlay = "true"
}
}修改
currentTrack的赋值部分。1
2
3
4
5
6
7
8
9
10
11
12
13var currentTrack = localStorage.song, audio, timeout;
var shuffle_array = localStorage.qplayer_shuffle_array;
if (isShuffle && shuffle_array != undefined && playlist.length === (shuffleArray = JSON.parse(shuffle_array)).length) {
shuffleIndex = 0;
if (currentTrack == undefined) {
currentTrack = shuffleArray[0];
$('#QPlayer .cover').attr('title', '点击关闭随机播放');
}
} else {
isShuffle = false;
$('#QPlayer .cover').attr('title', '点击开启随机播放');
}然后,将最开始调用的
loadMusic替换为FirstLoad函数,这样就可以在打开/刷新页面时将播放上次的音乐和上次的时间。1
2
3
4
5
6
7
8- loadMusic(currentTrack);
+ FirstLoad(currentTrack, localStorage.time);
if (sessionStorage.autoPlay == "true") {
play()
}
if (localStorage.volume == undefined) {
localStorage.volume = 0.2
}~/hexo/source/static/js/player.js的$("div.ssBtn").click()控制播放器是否一直弹出,注释掉即可。
- 如果你想整个博客都能够播放音乐,在
~/hexo/themes/next/layout中新建_my目录 和audio.swig文件,并添加如下代码:(谨慎利用 Inject 功能,可能会出现DOMException: The play() request was interrupted的情况而无法播放)
1
2
3
4
5
6
7
8
9
10
11
12
13
14
15
16
17
18
19
20
21
22
23
24
25
26
27
28
29
30
31
32
33
34
35
36
37
38
39
40
41
42
43
44
45
46
47
48
49
50
51
52
53
54
55
56{% if theme.audio.enable %}
<head>
<meta charset="utf-8">
<meta name="viewport" content="width=device-width, initial-scale=1" />
<title></title>
<link rel="stylesheet" href="/static/css/player.css">
</head>
<div id="QPlayer">
<div id="pContent">
<div id="player">
<span class="cover"></span>
<div class="ctrl">
<div class="musicTag marquee">
<strong>Title</strong>
<span> - </span>
<span class="artist">Artist</span>
</div>
<div class="progress">
<div class="timer left">0:00</div>
<div class="contr">
<div class="rewind icon"></div>
<div class="playback icon"></div>
<div class="fastforward icon"></div>
</div>
<div class="right">
<div class="liebiao icon"></div>
</div>
</div>
</div>
</div>
<div class="ssBtn">
<div class="adf"></div>
</div>
</div>
<ol id="playlist"></ol>
</div>
<script src="//cdn.bootcss.com/jQuery.Marquee/1.3.94/jquery.marquee.min.js"></script>
<script>
var playlist = [];
{% for src in theme.audio.sources %}
playlist.push({title:'{{src.title}}',artist:'{{src.artist}}',mp3:'{{ src.mp3 }}',cover:'{{src.cover}}'})
{% endfor %}
var isRotate = true;
var autoplay = false;
</script>
<script src="/static/js/player.js"></script>
<script>
function bgChange(){
var lis= $('.lib');
for(var i=0; i<lis.length; i+=2)
lis[i].style.background = 'rgba(246, 246, 246, 0.5)';
}
window.onload = bgChange;
</script>
{% endif %}
1
2
3
4
5
6{% include '_third-party/exturl.swig' %}
+ {% include '_my/audio.swig' %}
</body>
</html>
- 在主题配置文件中添加如下项:其中
enable控制是否加载播放器,sources代表音乐的配置项。获取音乐外链前试听。如果有多个音乐的话,每个音乐之间用,隔开。
1
2
3
4
5
6
7
8
9
10
11
12audio:
enable: true
sources: [
{title: '午后庭院',
artist: '夏天播放',
mp3: 'https://music.163.com/song/media/outer/url?id=29095562.mp3',
cover: 'https://p1.music.126.net/5uQHiJSmUMo74VAR4KJCTA==/6670737045946097.jpg' },
{title: '远走高飞',
artist: '金志文',
mp3: 'https://music.163.com/song/media/outer/url?id=1297742772.mp3',
cover: 'https://p1.music.126.net/elfqBKIdad0KYCCeKQpDSA==/18700493767108166.jpg' }
]
- 自此,整个H5播放器的基本设置就完成了。另外,可以自定义HTML5音乐播放器颜色:
1
2
3
4
5
6
7
8
9
10
11
12
13
14
15
16
17
18
19
20
21
22
23
24
25
26
27#pContent .ssBtn {
width:20px;
height:60px;
+ background:#1abc9c none repeat scroll 0% 0%;
position:relative;
right:0px;
bottom:0px;
box-sizing:border-box;
border-left:none;
cursor:pointer;
display:box-shadow:;
float:right;
}
#playlist li:hover {
color:#716e6e;
font-weight:bold;
+ border-left:3px solid #1abc9c;
padding:3px 15px 3px 11px;
}
#playlist li.playing {
color:#716e6e;
font-weight:bold;
+ border-left:3px solid #bc1a1a;
padding:3px 15px 3px 11px;
}
另外,你也可以添加音量控制。播放器里是有两个上一首和下一首的按钮的,左键点击他们就会切换歌曲,那么我们让他右键点击降低和升高声音就好啦。
已知bug:无缓存第一次的声音存在bug,如有缓存时,音量默认为系统音量的0.2倍。
1 | $(document).bind("contextmenu", function () { |
V.V.XIII. 依赖库 CDN 加速
升级NexT v6后,需要手动安装Dependencies。如果出现问题,删除对应文件夹里面的.git文件夹。CI部署需要添加对应的SCRIPT到.gitlab-ci.yml文件。
1 | $ cd themes/next |
The jsDelivr is a really good CDN. It does not only crawl the js files from npm packages, and it crawls from the GitHub Releases! Therefore, we could use it to deliver some of our third-party plugins. The user doesn't need to manually clone repos, just change the vendors config, and it is done.
- Go to the third-party plugin repo, publish a Release.
- use the following link to reference the js files, just as other CDNs. And it could automatically minify the JS and CSS files, even if you don't have the minified version. Just use the
filename.min.jsor thefilename.min.cssto replace the file.
1 | https://cdn.jsdelivr.net/gh/user/repo@version/file |
V.VI. 建立博文
- 新建博文,格式与博客文件头
~/hexo//scaffolds/post.md一致。
1
2$ hexo new post "new blog name"
# 新建一个.md文件,并编辑完成自己的博客内容
Hexo 另外提供
draft机制5,它的原理是新文章将建立在source/_drafts目录下,因此hexo generate并不会将其编译到public目录下,所以hexo deploy也不会将其部署到 GitHub。- 本机预览草稿
$ hexo S --draft 将草稿发布为正式文章
$ hexo P <filename>
Markdown编辑器当然推荐Atom,可以直接在实现Atom的Git操作,更多内容点击查看Atom使用指南,Markdown语法。
图片大小设置
1
{% img [class names] /path/to/image [width] [height] [title text [alt text]] %}
V.VII. 标签插件
「标签」(Tag Plugin) 是 Hexo 提供的一种快速生成特定内容的方式。例如,在标准 Markdown 语法中,我们无法指定图片的大小。这种情景,我们即可使用标签来解决。Hexo 内置来许多标签来帮助写作者可以更快的书写,完整的标签列表 可以参考 Hexo 官网。另外,Hexo 也开放来接口给主题,使主题有可能提供给写作者更简便的写作方法。以下标签便是 NexT 主题当前提供的标签。详细设置可以参考内建标签。
但是就我自己的使用感受而言,一方面它的语法规则相对于MarkDown略为冗长和麻烦,另一方面支持这一功能的MarkDown引擎经常会导致各种各样的冲突和解析错误。所以我个人推荐,在写博客文件时,不使用任何Hexo内建的标签插件,而纯粹使用MarkDown原生语法。
V.VII.I. 文本居中引用
此标签将生成一个带上下分割线的引用,同时引用内文本将自动居中。文本居中时,多行文本若长度不等,视觉上会显得不对称,因此建议在引用单行文本的场景下使用。例如作为文章开篇引用 或者 结束语之前的总结引用。
使用方式:
- HTML方式:使用这种方式时,给
img添加属性class="blockquote-center"即可。 - 标签方式:使用
centerquote或者 简写cq。
此标签要求 NexT 的版本在 0.4.5 或以上。若你正在使用的版本比较低,可以选择使用
HTML方式。
标签调用方法
1 | <!-- HTML方式: 直接在 Markdown 文件中编写 HTML 来调用 --> |
效果示例:

V.VII.II. 代码块
codeblock代码块用法如下:
1 | {% codeblock [title] [lang:language] [url] [link text] %} |
另一种形式的代码块,不同的是它使用三个反引号来包裹,[language] [title] [url] [link text]。推荐使用这种方式,避免了特殊字符的转义高亮。
[language]是代码语言的名称,用来设置代码块颜色高亮,非必须;[title]是顶部左边的说明,非必须;[url]是顶部右边的超链接地址,非必须;[link text]如它的字面意思,超链接的名称,非必须。
如果需要对比功能,你只需在 [language] 这写diff,然后在相应代码前面加上-和+就行了。也可以自定义对应的代码颜色,修改如下代码:
1 | // 文章```代码块diff样式 |
V.VII.III. note 标签
- 在主题配置文件中开启配置:
1
2
3
4
5
6
7
8
9
10
11
12
13
14# Note tag (bs-callout).
# [class] : default | primary | success | info | warning | danger.
note:
# Note tag style values:
# - simple bs-callout old alert style. Default.
# - modern bs-callout new (v2-v3) alert style.
# - flat flat callout style with background, like on Mozilla or StackOverflow.
# - disabled disable all CSS styles import of note tag.
style: simple
icons: true
border_radius: 3
# Offset lighter of background in % for modern and flat styles (modern: -12 | 12; flat: -18 | 6).
# Offset also applied to label tag variables. This option can work with disabled note tag.
light_bg_offset: 0
- 在正文
.MD文件中插入如下代码即可,包括了success/warning/default/info/danger:
1 | {% note warning %} warning {% endnote %} |
success
V.VII.IV. Button 标签
1 | Usage: {% button /path/to/url/, text, icon [class], title %} |
Button with text
1 | {% btn #, Text %}{% btn #, Text & Title,, Title %} |
Button with icon
1 | <p>{% btn #,, home fa-5x %} |
Text & Icon (buggy) Text & Icon (fixed width)
Text & Large Icon Text & Large Icon & Title
Button inside other tag
1 | {% note default %} |
Button margin
1 | <div class="text-center"><span>{% btn #,, header %}{% btn #,, edge %}{% btn #,, times %}{% btn #,, circle-o %}</span> |
V.VII.V. Tabs 标签
- 在主题配置文件中开启配置:
1
2
3
4
5
6
7# Tabs tag.
tabs:
enable: true
transition:
tabs: true
labels: true
border_radius: 0
- 源码,
, 2表示一开始在第二个选项卡,非必须,若数值为-1则隐藏选项卡内容。更多用法请查看 这个页面 。
1 | {% tabs First unique name %} |
1 | {% tabs Fifth unique name %} |
1 | {% tabs Sixth unique name %} |
Tab tag permalinks:
1 | Permalink for > [Tab one](#tab-one). |
Tab tag with other tags:
1 | {% tabs Tags %} |
1 | code block tag |
VI. Jekyll BLOG
建立基于Jekyll的个人Github Pages有两条路线:
- 自己学习Jekyll教程和网页设计,设计绝对自我基因的网页。
- Fork(简单来说是把当前仓库复制一份到你的仓库,你可以进行修改,因为你的仓库是原来仓库的新的分支)已有的开源博客仓库,在巨人的肩膀上进行符合自我的创作。建议和我一样的小白们可以从第二条路线学起。Jekyll项目的wiki页面给出了大量优秀的风格各异的网站,点击右边的source链接,进入到作者的模版仓库,击右上角的
Fork。然后在你的主页里找到你刚才Fork的分支,点进去。点击Settings,将Repository name改为{你的Github用户名}.github.io,点击Rename。此时你会发现已经可以通过http://{你的Github用户名}.github.io访问你fork下来的网站啦!
利用git克隆(参考以前内容)后,这时所有远程仓库里的源码都拷贝到 e:/workspace/{username}.github.io 这个文件夹里来了。如果clone失败有可能是网络原因,可以过一个时段再试,或者寻找梯子。
打开本地仓库的 _posts 文件夹,你的所有博文都将放在这里,写新博文只需要新建一个标准文件名的文件,在文件中编写文章内容。比如我们fork的模版中 _posts 文件夹里有一篇 2016-03-23-hello-world.markdown,你的文件命名也要严格遵循 年-月-日-文章标题.文档格式 这样的格式。(新文档建议使用template文件复制再修改,新建文档自己输入YAML文件头无法正常编译。)
参考链接:使用Github Pages建独立博客, Github Pages + Jekyll 独立博客一小时快速搭建&上线指南
VI.I. 评论功能
参考文献 http://cenalulu.github.io/jekyll/setup-comment-for-your-blog/ http://pizn.github.io/2011/11/15/use-disqus-for-your-post.html
注册一个Disqus帐号。
新建实例。注册完毕后登入帐号,点击Admin菜单进入管理页面,选择Add new site来新建一个实例,platform 选择jekyll。然后填入需要的资料。
对于 GitHub Page 来说,把这段代码,嵌入到
layout里面的post.html里面,放在最后就好了。
1
2
3
4
5
6
7
8
9
10
11
12
13
14
15
16
17
18
19
20<div id="disqus_thread"></div>
<script>
/**
* RECOMMENDED CONFIGURATION VARIABLES: EDIT AND UNCOMMENT THE SECTION BELOW TO INSERT DYNAMIC VALUES FROM YOUR PLATFORM OR CMS.
* LEARN WHY DEFINING THESE VARIABLES IS IMPORTANT: https://disqus.com/admin/universalcode/#configuration-variables*/
/*
var disqus_config = function () {
this.page.url = PAGE_URL; // Replace PAGE_URL with your page's canonical URL variable
this.page.identifier = PAGE_IDENTIFIER; // Replace PAGE_IDENTIFIER with your page's unique identifier variable
};
*/
(function() { // DON'T EDIT BELOW THIS LINE
var d = document, s = d.createElement('script');
s.src = 'https://XX(Website Name).disqus.com/embed.js';
s.setAttribute('data-timestamp', +new Date());
(d.head || d.body).appendChild(s);
})();
</script>
<noscript>Please enable JavaScript to view the <a href="https://disqus.com/?ref_noscript">comments powered by Disqus.</a></noscript>
- 文章中添加Yaml头文件信息
1
2
3layout: default
comments: true
# other options
VI.II. 标签功能
VI.III. 本地调试
- 事先准备。安装 Jekyll 相当简单,但是你得先做好一些准备工作。开始前你需要确保你在系统里已经有如下配置。
- Ruby,For example,
Ruby 2.3.3-p222 (x64) - Ruby DevKit,For instance,
DevKit-mingw64-64-4.7.2-20130224-1432-sfx.exeis for 64-bit Windows with Ruby 2.3.3 x64. - RubyGems
- Unpack into a directory and
cdthere - Install with:
ruby setup.rb(you may need admin/root privilege)
- Unpack into a directory and
- NodeJS, 或其他 JavaScript 运行环境(Jekyll 2 或更早版本需要 CoffeeScript 支持)。
- Python 2.7(Jekyll 2 或更早版本)
- 用 RubyGems 安装 Jekyll。安装 Jekyll 的最好方式就是使用RubyGems. 你只需要打开终端输入以下命令就可以安装了。所有的 Jekyll 的 gem 依赖包都会被自动安装,所以你完全不用去担心。如果你在安装中碰到了问题,请查看 troubleshooting 或者 report an issue 那么 Jekyll 社区就会帮助你解决问题了。
1
$ gem install jekyll
- Initialize and create config.yml file. In opened notepad window, if it's not already there, add a new line
- C:/Ruby23at the end, save and close.
1
2
3
4cd C:/RubyDevKit
ruby dk.rb init
notepad config.yml
ruby dk.rb install
- Install Jekyll and Bundler.
1
2
3
4gem install jekyll bundler
# Verify that Jekyll gem has been installed properly
jekyll -v
bundle -v
- Start Jekyll。用浏览器打开
http://127.0.0.1:4000,即可看到效果,而且在修改文件的同时刷新页面即可实时更新。
1
2
3jekyll new myblog
cd myblog
bundle exec jekyll serve
第二种方法:未成功链接github-page,只能复制到jekyll本地博客进行调试。
在你的site(github-page) 主目录下,执行
bundle install你的site(github-page) 根目录下执行
bundle exec jekyll serve启动jekyll,默认访问地址为:http://localhost:4000,这样你就顺利的得到了一个本地版的github-page镜像。最后你可以随时更新你本地的jekyll,通过bundle update。
VII. 域名绑定
域名设置参考域名绑定,GitHub Pages 绑定来自阿里云的域名。
CNAME记录就是把域名解析到另外一个域名,再转跳到IP。A记录就是把一个域名解析到一个IP地址。如果没有A记录,www域名无法访问。CNAME文件是否包含www决定了在同时配置了顶级域名和www域名的情况下,浏览博客时网址栏是否包含www。所以,带不带www看个人喜好。
- CNAME记录比较稳定,一旦主机的IP发生变化,无需重新解析。
- CNAME记录的生效时间要比A记录快。
- 如果你的CNAME文件内容加了www,那么就直接配置CNAME记录就可以了。在域名解析中添加一项CNAME记录解析,主机记录填
www,记录值填写你的域名如usermane.github.io.,这样就可以通过www.hostname来访问。 - 如果你的CNAME文件内容没有加www,那么就需要配置A记录,通过
hostname访问。主机记录填@,记录值填官方服务器ip(ping username.github.io.获取)。
(2020年4月2日更新)目前带不带www的域名解析都可以通过CNAME解析实现。设置主机记录www/@,记录类型为CNAME,记录值是username.github.io.。
明白了基础后,下面进行域名绑定,实现在加或者不加www的基础上都能访问。
域名可以在很多地方购买,如万网。万网域名解析设置方法。
添加Github Pages解析。博客配置好后,在
Hexo/source中建立CNAME文件,把文件内容改成你购买的域名,如hosname,不需要加http这样的前缀。在万网的域名解析界面按如下设置,设置Github Pages解析为海外:
- 在阿里云控制台,设置主机记录@,记录类型为A,记录值是IP:
185.199.108.153(Github Pages服务器指定的IP地址:185.199.108.153,185.199.109.153,185.199.110.153,185.199.111.153)。 - 在阿里云控制台,设置主机记录www,记录类型为CNAME,记录值是
username.github.io.。如果你想将blog.hostname映射到usermane.github.io.,那么在主机记录中就应该填写blog,记录类型为CNAME,记录值是usermane.github.io.。而且这个时候,你github项目的CNAME文件内容也应该相应的改为blog.hostname。
添加CODING Pages解析。在项目主页访问
构建与部署->静态网址->设置,输入你的自己的域名就可以了。一般只配置了CNAME,可以将coding page绑定多个域名实现跳转,设置首选即可(需完善个人信息才能绑定)。原Coding网址的CNAME记录:pages.coding.me.,IP地址:192.30.252.154,192.30.252.153。2020年01月以后Coding网址的CNAME记录:xxx.coding-pages.com,IP地址:124.156.187.34,150.109.4.162。仅供参考。修改站点配置文件中的url地址为
http://你的域名,配置完了之后经过一段时间的等待就能通过域名访问博客啦,最终域名都跳转到hosname。
VII.I. 项目主页
- 新建一个repo,repo名字随意。
- 点进repo主页然后点击右面的
Settings,页面往下拉到GitHub Pages部分,选择Launch automatic page generator>Continue to layouts>Publish page即可。
这样一个项目主页就建立完成了,此时可以用
<username>.github.io/<projectname>访问到了。
VII.II. 绑定二级域名
测试成功
不考虑绑定的自定义域名的前提下,个人主页的GitHub二级域名为<username>.github.io,项目主页的GitHub二级域名为<username>.github.io/<projectname>,没有<projectname>.<username>.github.io这种方式。个人主页的展示内容以master分支里的文件为准;而项目主页的展示内容以gh-pages分支内的文件为准。
Github 的项目支持使用 gh-pages 分支生成项目页。绑定在http://sli1989.github.io/project-name,并且也支持设置CNAME。
1
2
3
4
5
6
7
8
9
10url: http://test.saili.science
# url: https://sli1989.github.io/blog
# 根目录改成/博客仓库/
# root: /blog/
deploy:
- type: git
repo: 'git@github.com:sli1989/testing.git'
branch: gh-pages
- 对于非博客仓库,我们也需要将branch改成
gh-pages才可以使用。
1
2
3
4
5
6
7
8
9
10
11
12git clone git@github.com:sli1989/testing.git
# 首先复制你的git项目地址,就是以.git结尾的那个地址,将其拉到本地来。
cd testing
# 进入代码目录
git checkout -b gh-pages
# 在本地建立一个分支 并切换到新分支
git push origin gh-pages
# 将新分支发布在github上
git branch -d master
# 将本地的master分支删除
git push origin :master
# 将github远程端的master分支删除
修改CNAME文件,将其指向的域名,比如我的
test.saili.science,不要添加任何空格或者回车之类的符号。添加域名解析记录。选择CNAME 解析,主机记录为
test(你想要得域名),记录值为sli1989.github.io。点击保存,一般10分钟以内就生效,就可以直接访问test.saili.science。
VIII. HTTPS访问
比较麻烦,还是不要折腾了。
参考链接:获得小绿锁一把!(启用Https),博客启用全站HTTPS,Gitlab上设置证书,Gitlab-pages的https访问设置。Coding-pages的https访问设置
HTTPS全称Hypertext Transfer Protocol Secure 超文本安全协议。也就是HTTP加上安全传输层协议TSL/SSL。介于HTTP层与TCP层之间的一层安全协议。通过安全认证,可以避免HTTP中间人攻击,信息污染,信息劫持等问题。详细信息的话腾讯Bugly的文章全站HTTPS来了介绍得很详细。HTTPS基础原理,通信过程,在这篇文章里都有详细地讲到。
如果是放到Github上,如果按照官方的文档,你不能使用自己的证书,如果使用了自定义的域名,就不能使用https了。 当然你可以自己再搭个服务器, 然后做一下转发,但是这样就感觉有点多余了。如果不自建服务器, 就只能从DNS入手,目前国内的DNS供应商都没有提供免费的HTTPS认证, 但是可以使用国外的cloudflare。但是https环境无法正常解析embed类音乐插件。
VIII.I. GitLab Pages添加SSL
参考链接:Gitlab上设置证书
知乎上有一篇帖子,无意间介绍了两个提供免费证书的服务商,一个叫StartSSL,另一个是沃通SSL。
VIII.I.I. 阿里云证书
申请的免费证书,但无法部署证书到Github,
- 登录阿里云控制台,购买证书。证书类型选择 免费型DV SSL,然后完成购买。
- 在我的证书 控制台,找到购买的证书,在操作栏里选择 补全。填写证书相关信息。域名验证:可以选择 DNS,如果域名用了阿里云的 DNS 服务,再勾选一下 证书绑定的域名在 阿里云的云解析。系统生成 CSR,点一下 创建。提交审核。
- 如果一切正常,10 分钟左右,申请的证书就会审核通过。注意查看“进度”,进行“检查配置”保证正确配置。
1
2
3增加如下DNS记录(24小时内有效,过期后请重新获取记录并配置)
记录类型:TXT
主机记录:@*.key,一个是 *.pem。 5. 根据不同的Web Server类型选择不同的子压缩包。Gitlab的Pages只支持pem(证书的另一种格式)格式的证书和私钥。下载证书for Nginx。回到GitLab,找到你的博客项目 **_Settings>Pages>+New Domain**。把你上一步生成得到的PEM certificate粘贴到第一栏,把private key粘贴到第二栏。然后点击Create New Domain。
VIII.I.II. CloudFlare证书
想要使用
CloudFlare的HTTPS服务,就必须使用它的nameserver,也就是使用它的域名解析服务。添加一条A记录,指向52.167.214.135,然后添加一条CNAME记录,把www子域名设置成yourname.gitlab.io。当你的域名接入之后,点击Crypto,找到Origin Certificates,点击Create Certificate。把生成的证书和私钥都保存到本地,接下来需要用到。回到
GitLab,找到你的博客项目 Settings>Pages>+New Domain:
把你上一步生成得到的PEM certificate粘贴到第一栏,把private key粘贴到第二栏。
VIII.II. Coding Pages添加SSL
在域名配置中,点击开启强制 HTTPS 访问即可。目前只能配置www.hostname,无法去掉www。
启用过程中遇到几个需要注意的地方(坑),在这里总结下:
如果你在启用HTTPS前,已经绑定好了自定义域名。记得全部解绑后,重新绑定。否则不会自动申请SSL证书。
如果你采用了
Coding Page和GitHub Page双托管的方式,记得将DNS中解析到GitHub Page的记录暂停或删除。否则Let's Encrypt主机根据域名解析记录验证域名所有权时,会定位到GitHub Page的主机上,导致Let's EncryptSSL证书申请失败。
VIII.III. CDN方式
CDN的全称就是Content Delivery Network,内容分发网络。其最基本的思路就是,用户在访问一个网站的时候,不直接访问这个网站的服务器,CDN系统会根据地理位置,将用户重新导向离其最近的CDN服务器。网站的内容在这个CDN服务器上会有相应的缓存,从而使用户更快地访问到所需要的内容,可以减少网络拥堵的情况,也可以减轻网站的服务器承受太大的访问量,以及带宽不足的情况。
VIII.III.I. CloudFlare添加SSL
考虑到 GitHub Pages 不提供对自定义域名的 https 服务,你需要一个反向代理给你加上 HTTPS , CloudFlare 是最好选择。虽然这里所使用的方法,不是安全的一种方法。网站仍然会面临中间人攻击等一系列问题。因为服务器与CDN之间的通信未加密。但是至少用户在访问网站的时候,不会被通信服务商再拦截再什么广告了。
当Coding + GitHub 双 Pages 部署,CloudFlare 的 NS 不能分区解析,所以无法直连 Coding 服务器。
网页反应有点慢,多等待至能够输入。因为CloudFlare的SSL协议标准与国内标准不同的原因,并且在国内没有相应节点,所以会访问慢,还可能会起着反效果。
CloudFlare提供的SSL服务是基于SNI技术的,也就是说,机子上是IE8及以下用户完全无法打开(Chrome使用证书为系统,所以在win7下IE8的Chrome浏览器也是无法打开的,无论版本)
创建CloudFlare帐户,并添加网站。
登陆后,增加你的域名。输入你的域名,例如 yicodes.com 并点击 Begin Scan。注意不要写WWW前缀,大约60秒即可完成域名解析扫描。完成后点击 Continue Setup 继续下一步。

选择免费计划,然后下一步~
到你域名控制面板修改cloudflare给出的域名服务器。注:官方说明,域名服务器修改最长需要72小时生效 ,用了两个域名测试,大约需要 5~30 分钟,看到 Status: Active 即可
1
2
3Current Nameservers Change Nameservers to:
dns19.hichina.com david.ns.cloudflare.com
dns20.hichina.com lily.ns.cloudflare.com
点击 crypto 菜单 , 然后设置
full。点击
Page Rules - create Page Rules菜单,添加自动重定向到 SSL页面。填写完毕之后点击Save and Deploy就可以了,可能需要一段时间,毕竟有缓存。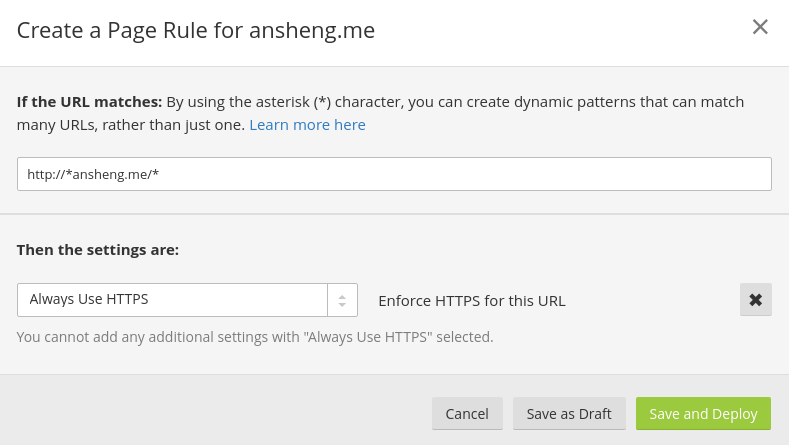
添加SSL的教程就此完成,一般需要5~30分钟生效!
至此,必须手动输入
https前缀才能访问加密的站点,要想在任何情况下都以加密方式访问网站,可以在网站模版的头中加入http到https的强制跳转。打开layout目录下的_layout.swig,在<head>标签中加入以下代码,注意把yoursite.com替换为你的域名,这里为g2ex.me。
VIII.III.II. 七牛免费SSL证书
未测试
VIII.III.III. Let’s Encrypt
未测试
Let’s Encrypt:安装Cerbot,配置SSL证书(本脚本使用Let's Encrypt,其余SSL证书请自行安装),等同于ssl 证书申请(开启 https 服务)。